The Advanced Assessment add-on makes it easier to create quizzes and assessments by allowing you to provide deeper insights and analysis of participants’ responses. It is ideal for personality quizzes and psychometric tests, as you can assign unique labels to quiz answers, resulting in a more personalized result.
This guide will walk you through installing, activating, and using the Advanced Assessment Addon.
Getting Started
1. Installation and Activation:
Install the QSM Advance Assessment Addon, following the Addon Installation Documentation. Activate the addon using your license key. Simply copy your license key from your QSM account. You can activate the Advanced Assessment add-on while editing your quiz by navigating to the Add-ons tab and selecting Advanced Assessment from the dropdown. Here, you can enter the license you copied from your QSM account.
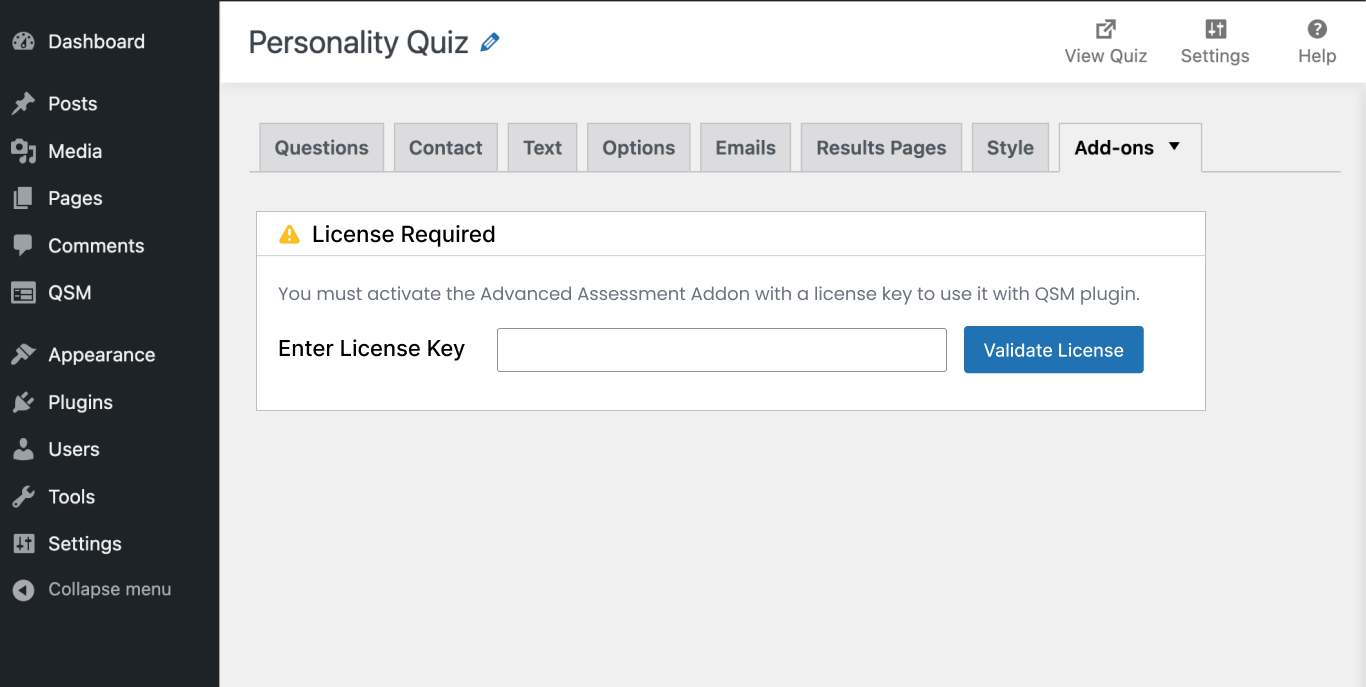
2. Configuring Advanced Assessment:
Enable the Advanced Assessment feature within your quiz or survey settings to begin setup.
- Step 1: Go to your quiz or survey and select “Advanced Assessment” under the Addons tab drop-down.
- Step 2: To use the Advanced Assessment features on a particular quiz or assessment, click on the checkbox next to “Assess this form.”

Creating & Setting up Assessment
We have created a personality assessment that helps determine the participant’s personality type as an extrovert, ambivert, or introvert, depending on their answers to the assessment.
This assessment consists of multiple questions, with some answer options representing a specific personality type.
This guide will show you two ways to set your quizzes and assessments using the Advanced Assessment features.
- Option-Based Assessment
- Label-Based Assessment
Option Based Assessment
In the option-based approach, you can assess the answers based on the counts of responses received or the points earned in the answer options.
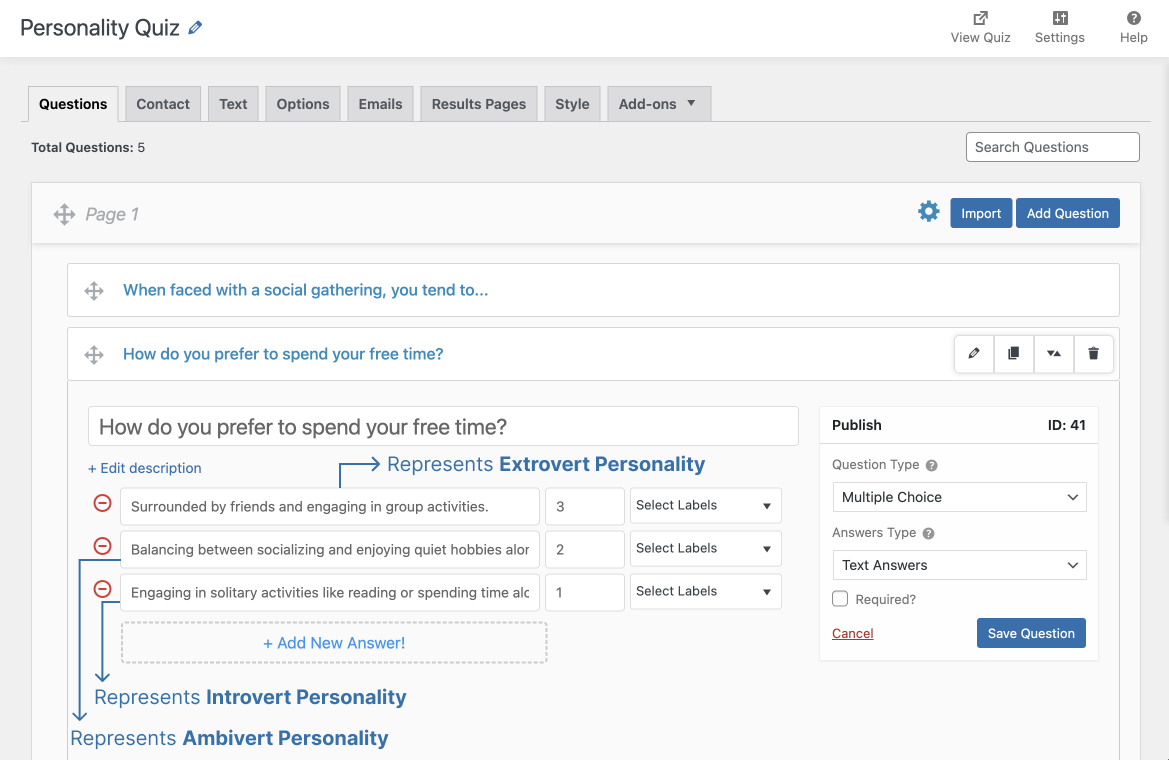
In this assessment, each answer position represents a type of personality. The representation of each answer position is listed below:
- All the First answers represent an extroverted personality
- All the Second answers represent an ambivert personality
- All the Third answers represent an introverted personality
Note:
To ensure accurate results, maintain a consistent order of options when creating a quiz or assessment based on options. The option’s order for all questions should remain the same as the first question.
Show Results for Option Based Assessment
Create result pages for each personality type. Start by adding conditions to the result page. To learn about setting up the result page in QSM, refer to the result setup documentation.
To show the results of an option-based assessment, we can set it in two ways:
- Result Based on Count of Answers
- Result Based on Points Earned in Answers
Set Results Based on Count of Answers
Show the results based on how many responses participants gave in the first, second, or third answer, and direct them to the result page that matches the result condition.
In this assessment, we have set different conditions for each personality type; participants will be directed to a specific result page based on their responses.
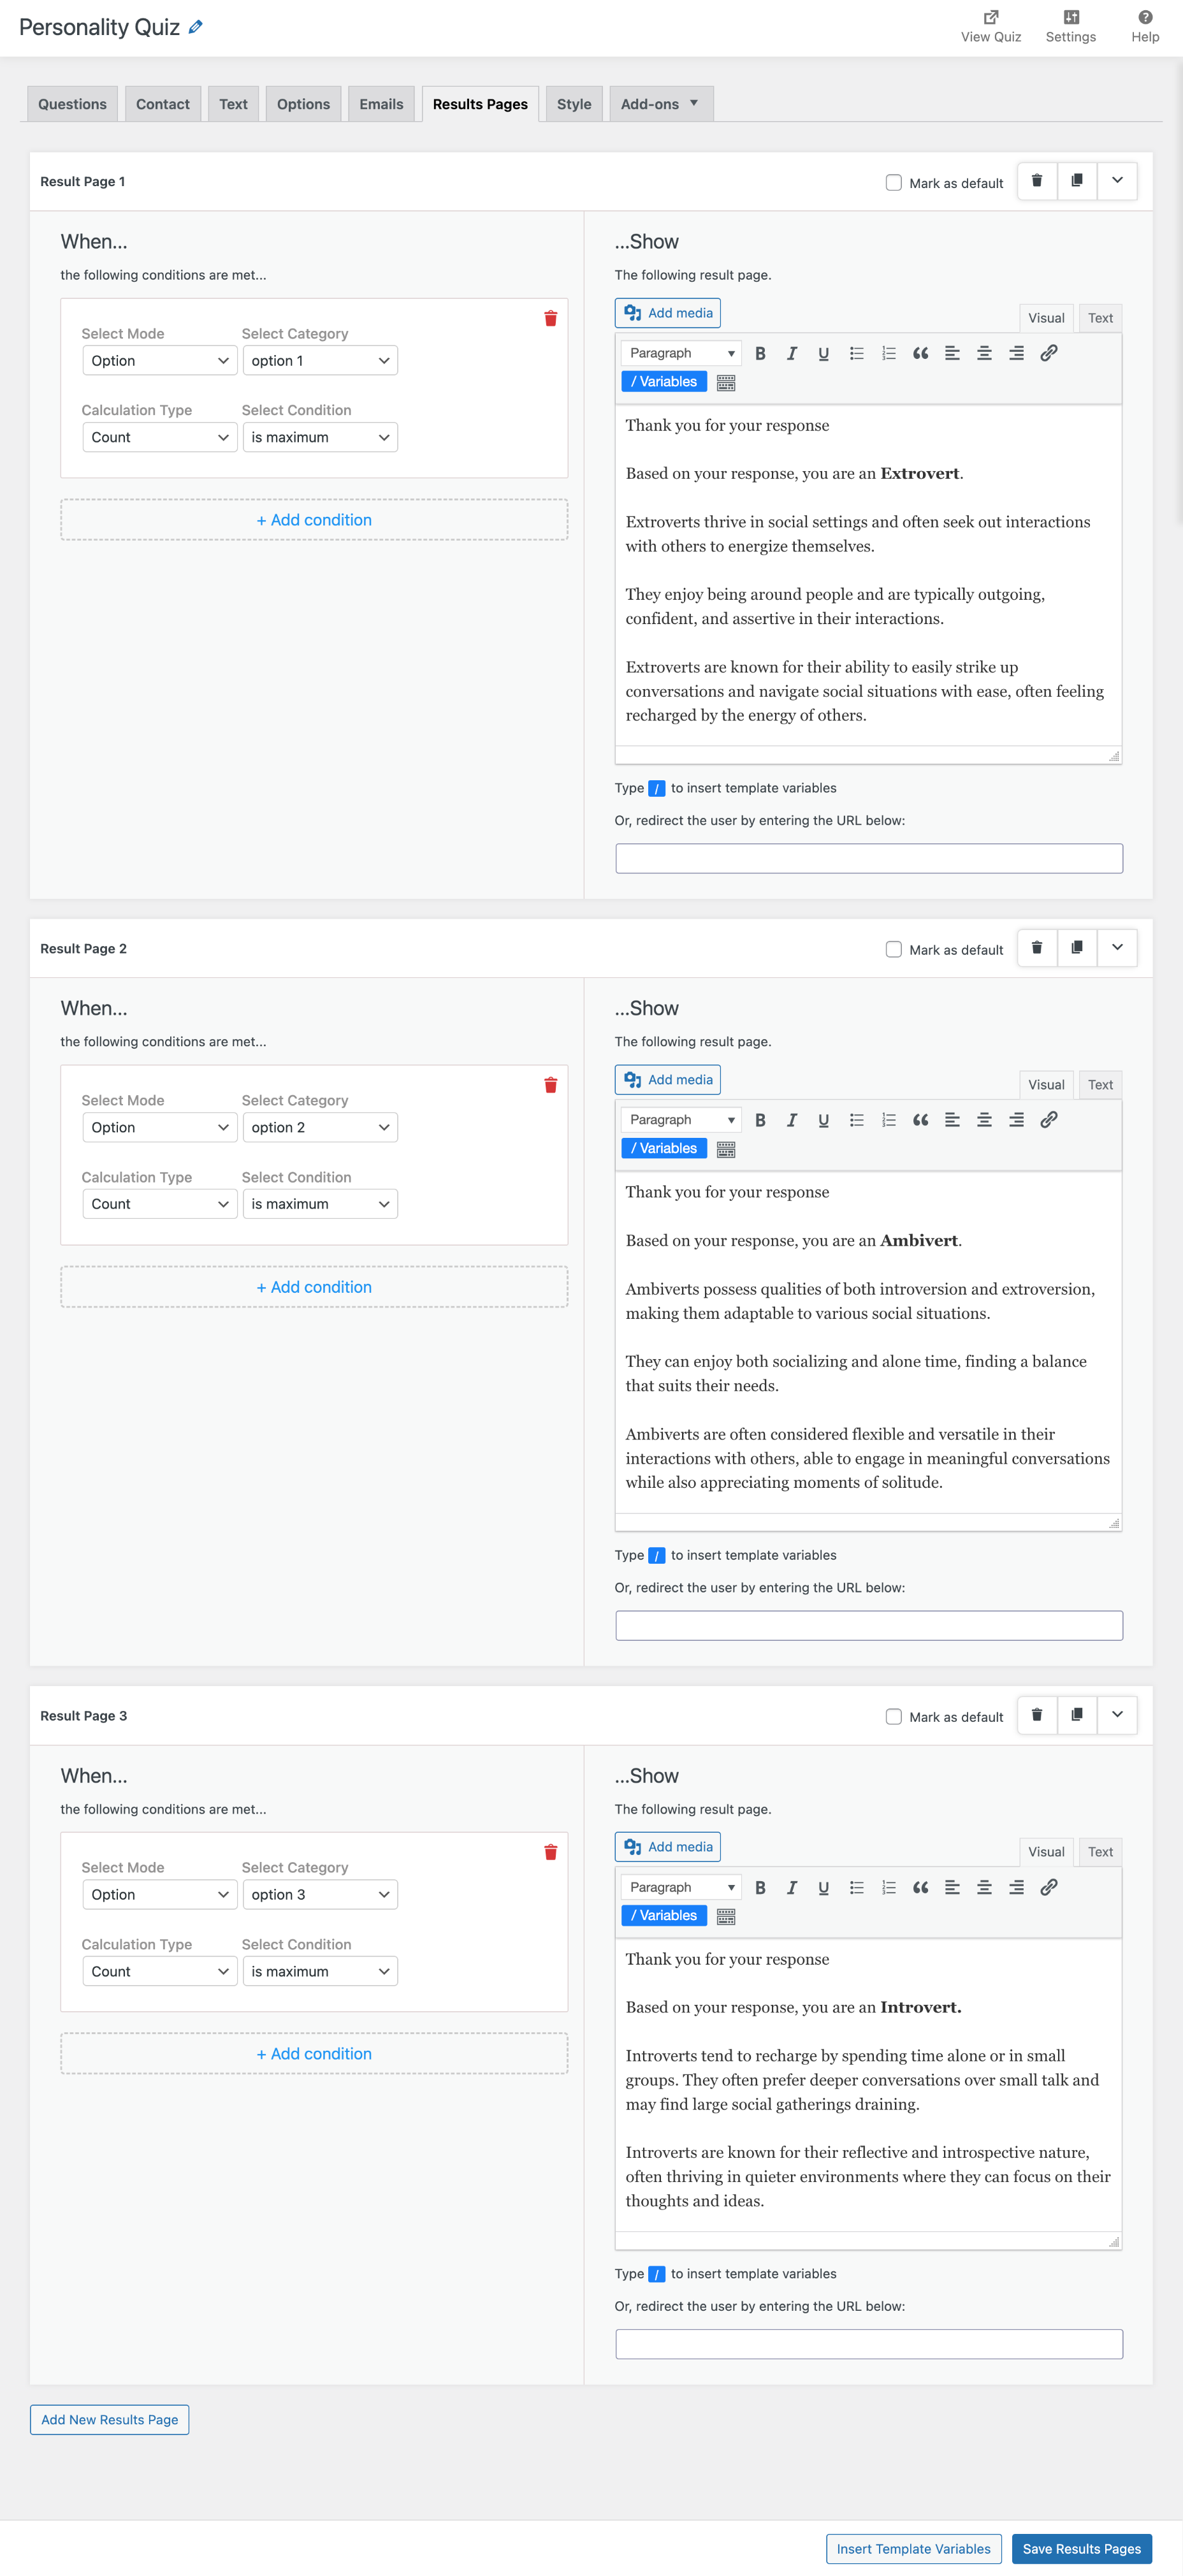
To set a result based on the maximum count of responses in an answer, follow the steps
Step 1: Result based on the count of first answer response
Here’s how to configure the result condition to count the maximum number of responses received in the first answer:
- Choose “Options” as the mode while adding the result condition
- Choose the answer position from the next drop-down menu. We will choose “Option 1” as we are assessing the result for the first answer.
- Now, select the calculation type as “count,” as we need to assess the result page based on the count of responses.
- Finally, select the condition; in this case, we have selected “is maximum” from the drop-down to calculate the maximum number of counts for the first answer.
Once the condition is set, we can enter a custom message to be displayed to the participants.
Step 2: Result based on the second and third answers
Once the first result page is set, you can create a new results page for another personality type by clicking on the “Add New Result Page” button or by duplicating the previous one.
Repeat the above steps on the new result page, selecting “Option 2” from the options dropdown to count the maximum number of responses in the second answer and “Option 3” to count the maximum number of responses in the third answer.
Similarly, you can set the results condition based on the minimum count of responses, allowing you to display the results based on the fewest number of answer options selected. When setting the result condition, select “is minimum” from the conditions drop-down.
Set Results Based on Points Earned Answers
Show the particular result based on the points earned in the answer options. In this method, participants will be directed to a result page that aligns with their personality type based on the points received in the selected answers.
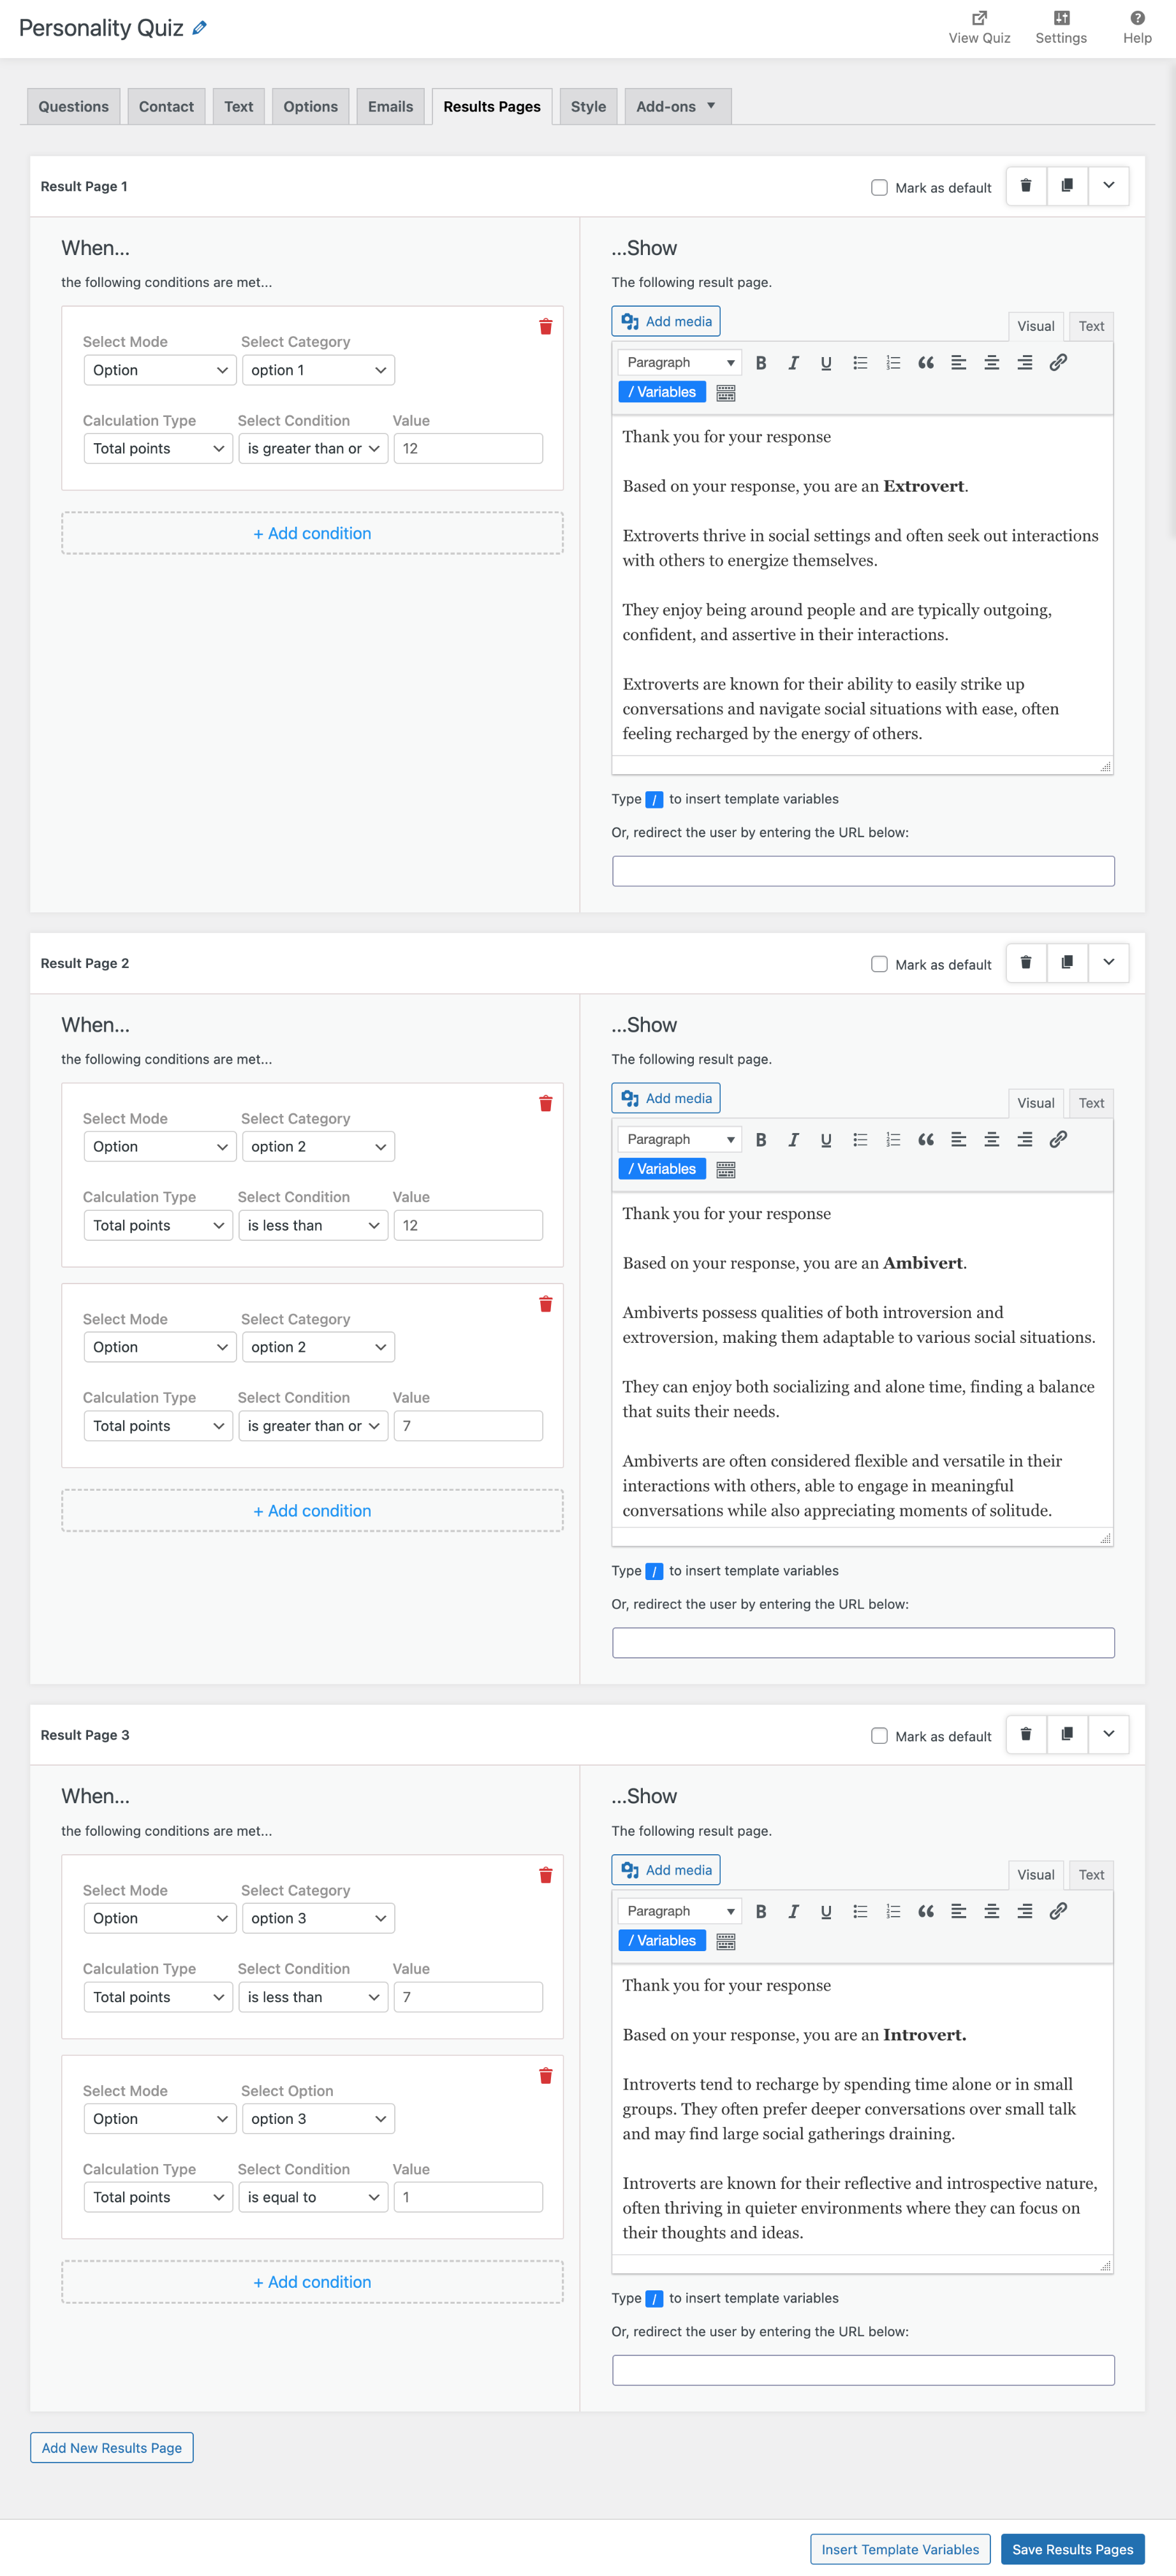
In this assessment, we have allocated 3 points to all the first answers, 2 points to the second answers, and 1 point to all the third answers. Let’s start by setting the result based on points scored in the options.
The configuration is the same as the results based on counts. When adding a result condition for a point-based system focused on the first answer, you must select the mode as Option and then select the option that you want to assess; in this case, we choose Option 1 to assess the first answer.
Now, select the calculation type as “total points” to assess the result based on the points earned in the selected answers.
Here’s how we have set our conditions:
- For the first answer, the total points should be 12 or higher to validate the personality type of an extrovert.
Select condition “Greater than or equal to” and set the value 12 - For the second answer, the score should be between 7 and 12 to validate the personality type of an ambivert.
Select the condition “less than” and set the value to 12. Then, create a new condition by selecting the condition “greater than or equal to” and setting the value to 7 - For the third answer, the score should be between 7 and 1 to validate the personality type of an introvert.
Select the condition “less than” and set the value to 7. Now, create a new condition by selecting “greater than or equal to” and setting the value to 1
The conditions may differ depending on the type of quiz you create. Every quiz has its own set of conditions, so feel free to experiment with them to get the results you want.
Tip to Make an Exciting Assessment:
Consider randomizing the questions and answers to add some challenge and excitement. Throughout the quiz, the order of the quiz options will vary for each respondent. The random order of questions and answers will only be visible to respondents; your quiz on your website’s backend will be unaffected.
Label-Based Assessment
Labels are like tags for quiz answers. Labels are used to categorize quiz answers for analysis. They’re invisible to participants but help customize result pages. Label details can be shown on the results page after the submission.
In this assessment, we will assign labels to each answer. The three labels are extrovert, ambivert, and introvert.
How to assign labels in a quiz or assessment
You can add labels while creating or editing the questions.
- After adding the answer options, click on the “Select Labels” dropdown next to the answer points. Enter a new label for each option or select from the existing list of labels and click on “Save Question.”
- Repeat this process for all answer options.
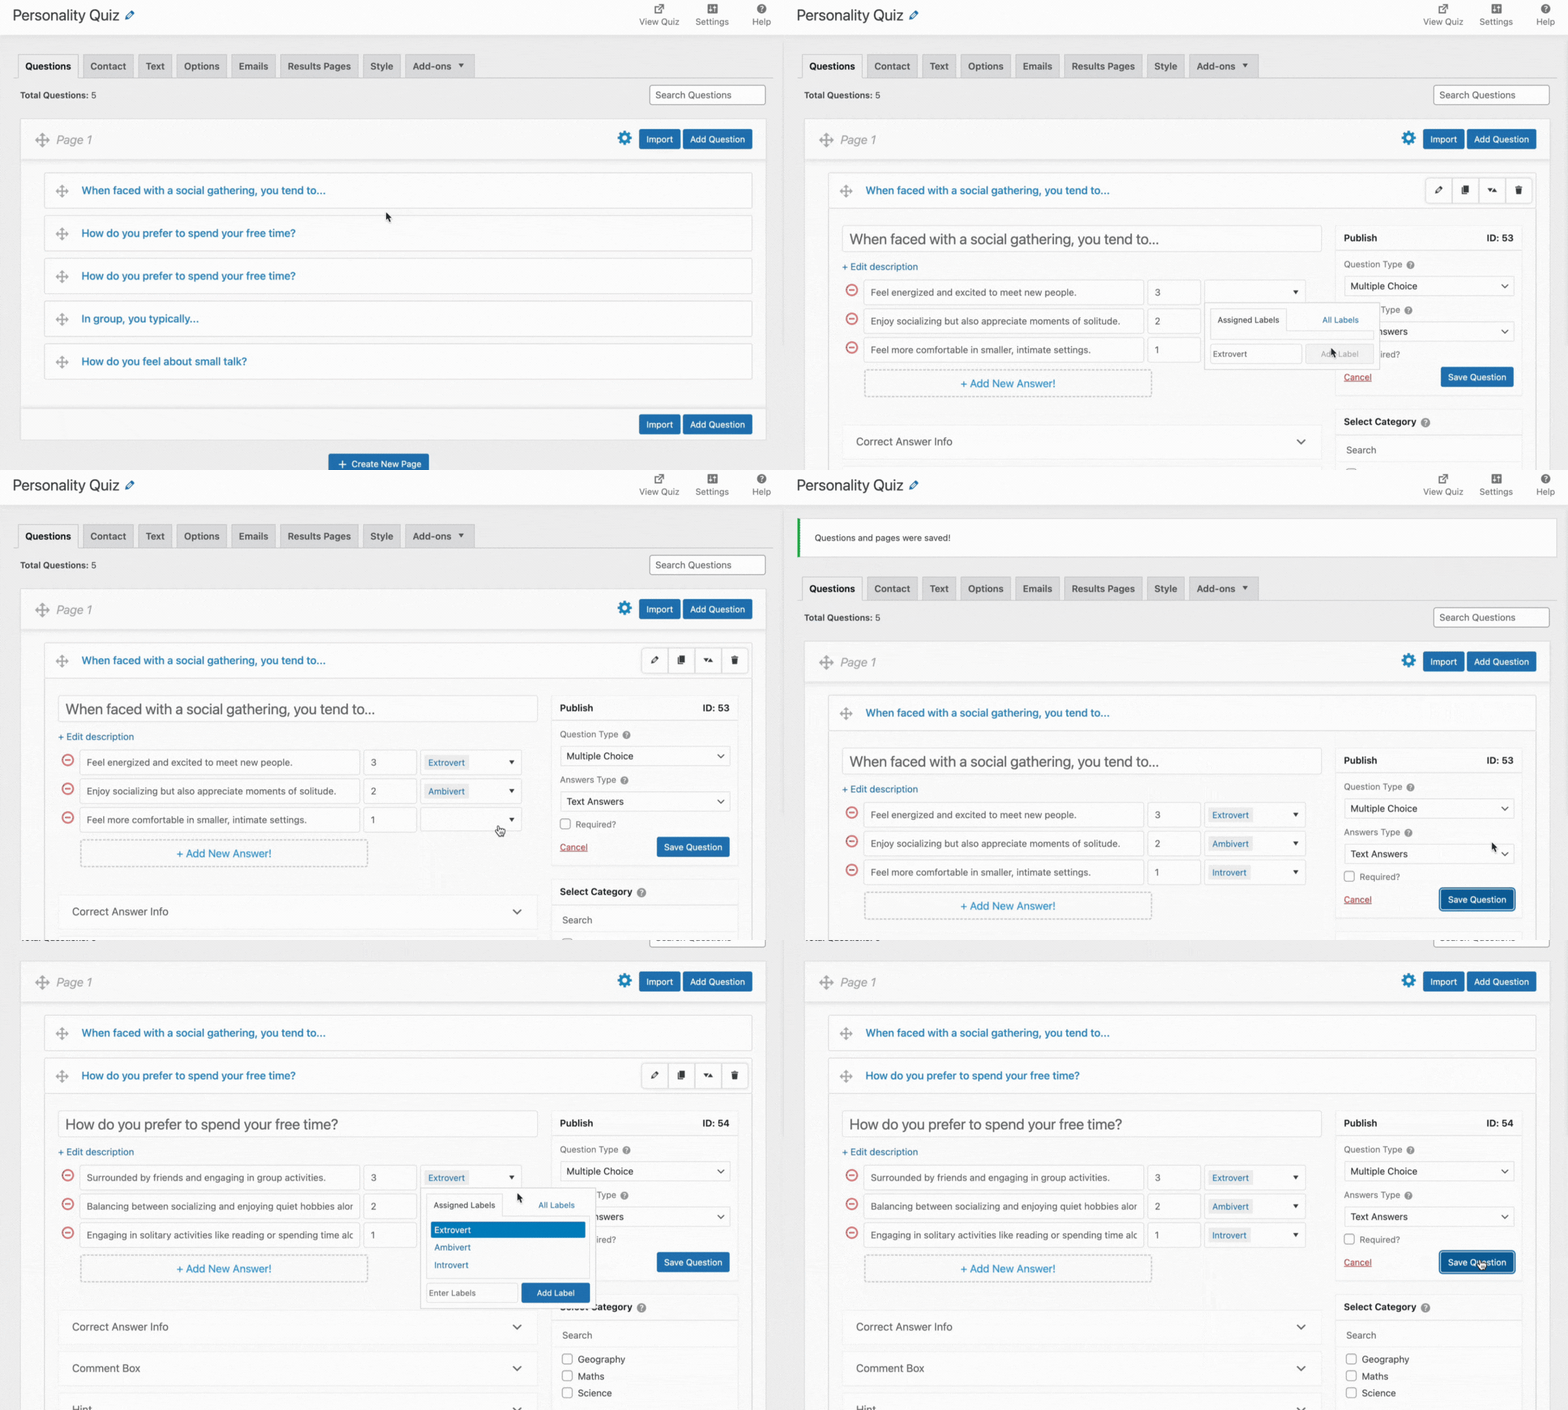
Now let’s set up the result of this assessment. We can set the results in two ways:
- Show Results Based on Label Counts
- Show Results Based on Label Points
Show Results Based on Label Counts
In this assessment, we want to show unique results to the participants based on how many times they chose each label.
- Start by selecting “Label” as the mode to assess the responses received for labels
- Select the label names from the label drop-down for which you want to set the result page. We have three results with the labels Extrovert, Ambivert, and Introvert.
- Choose “Count” as the calculation type to see results based on the number of counts received for the selected label.
- Finally, select “is maximum” from the condition dropdown, which allows the system to determine whether the selected label has the maximum number of responses from the participant to show the specific result page.
- Once done, click on the Save Settings button
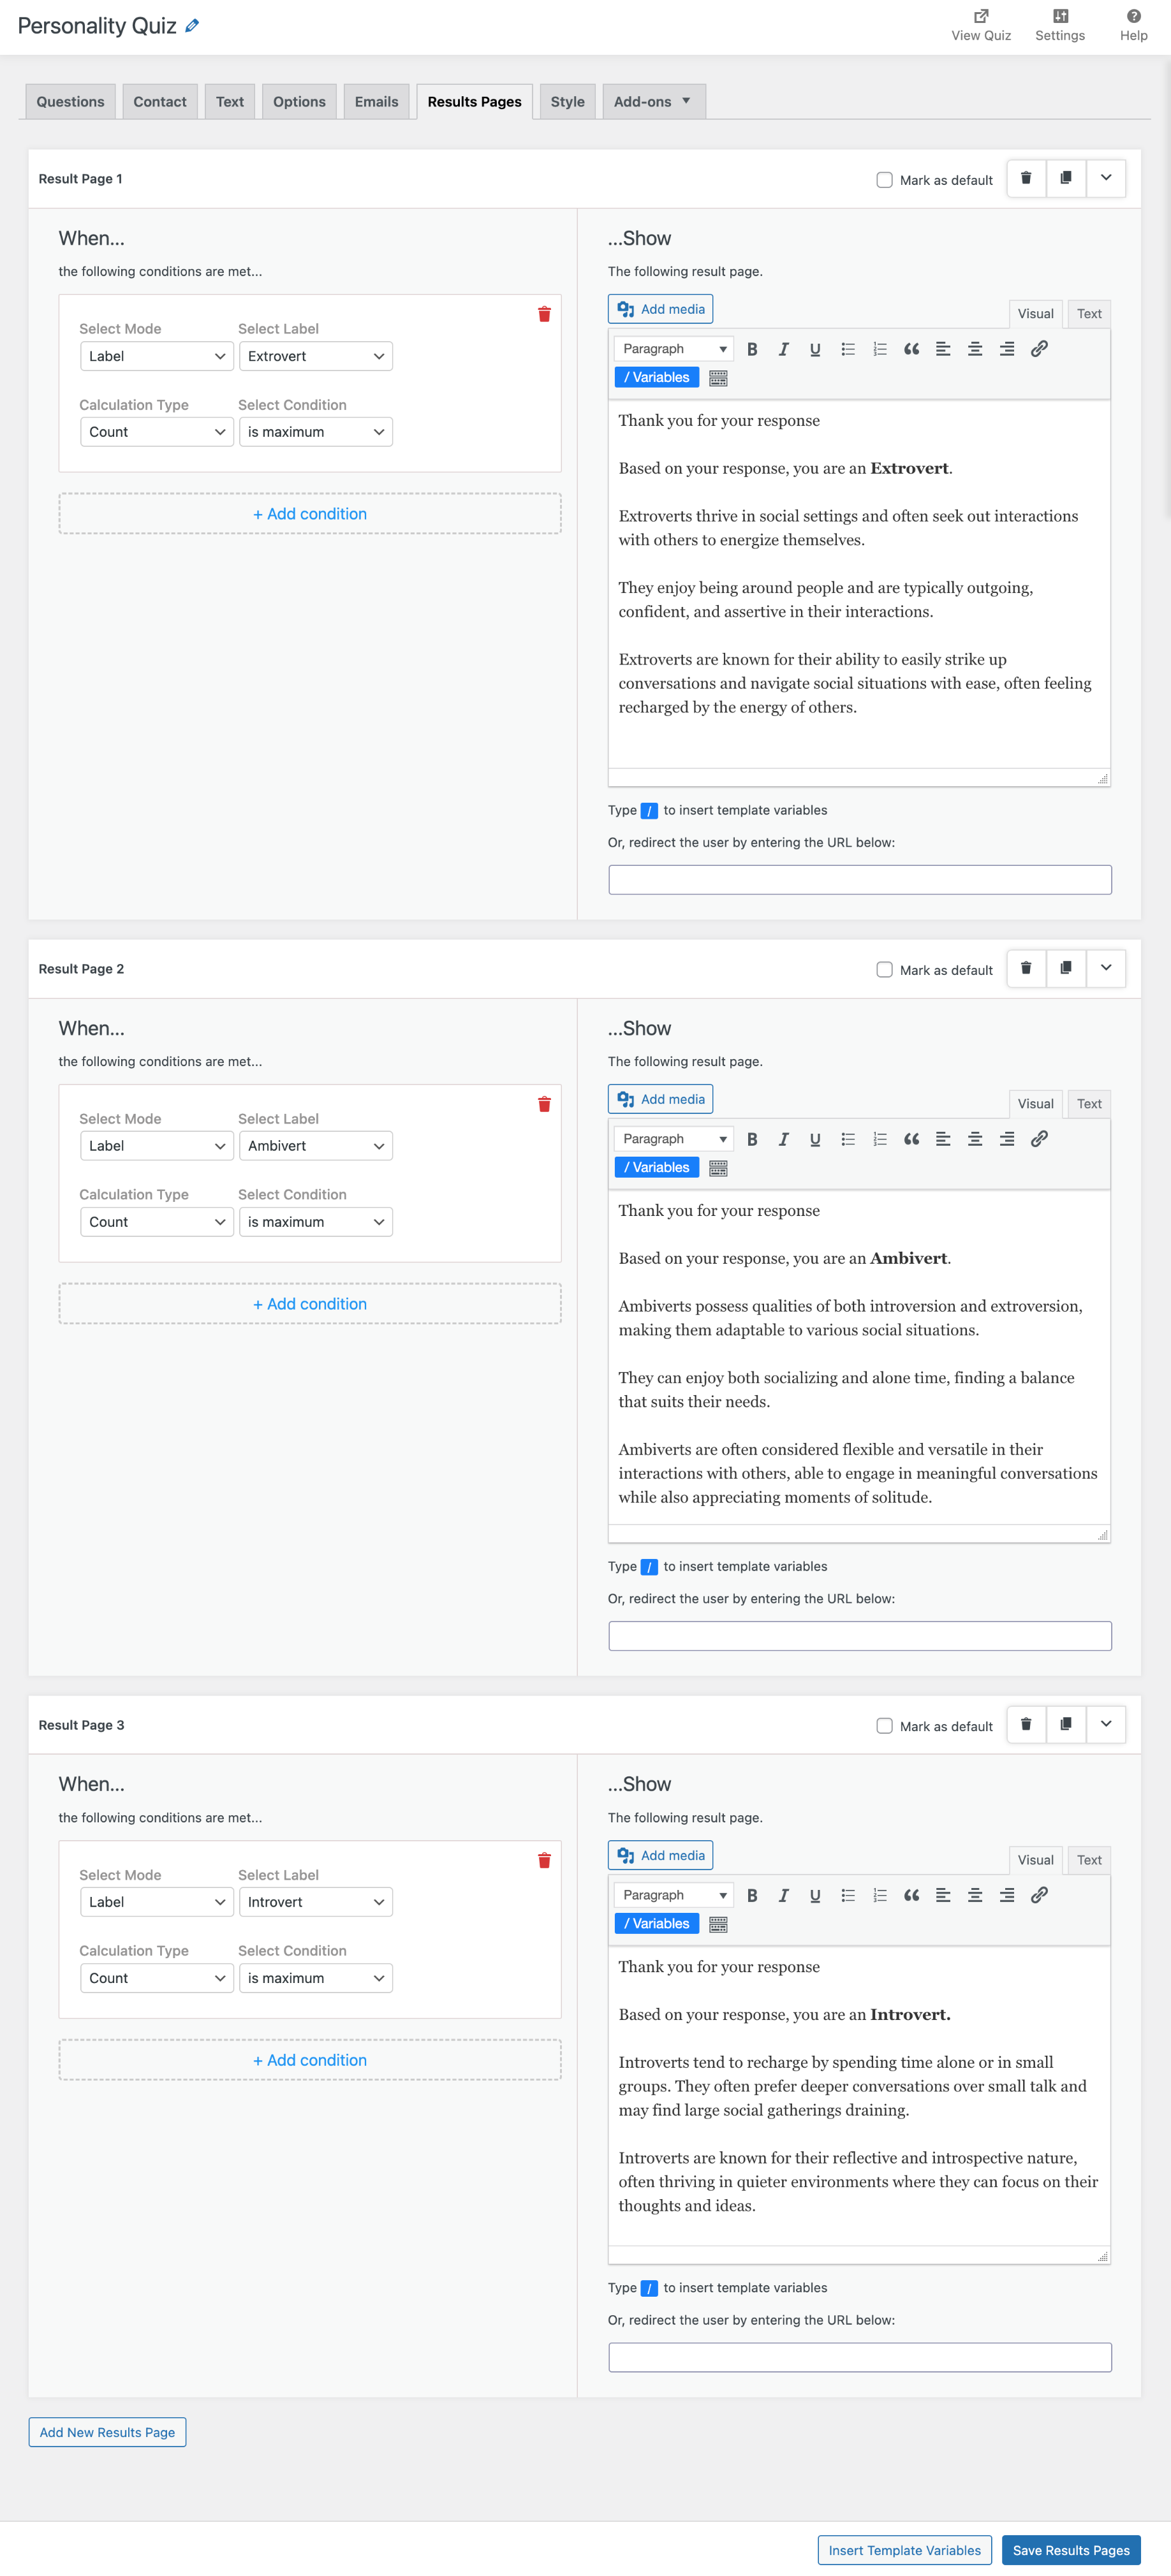
Similarly, you can create result pages for labels with the least number of responses. To assess the responses of labels with the lowest number of counts, simply select the “is minimum” condition.
Show Results Based on Label Points
In this assessment, the personality type will be revealed on the result page Based on the points received from the selected labels, there are two ways you can assess the labels based on points:
- Label-Based Assessment Using the Points of the Answers
- Label-Based Assessment Using the Separate Points for Each Label
1. Label-Based Assessment Using the Points of the Answers
In this assessment, the answer labels share points with the answer options.
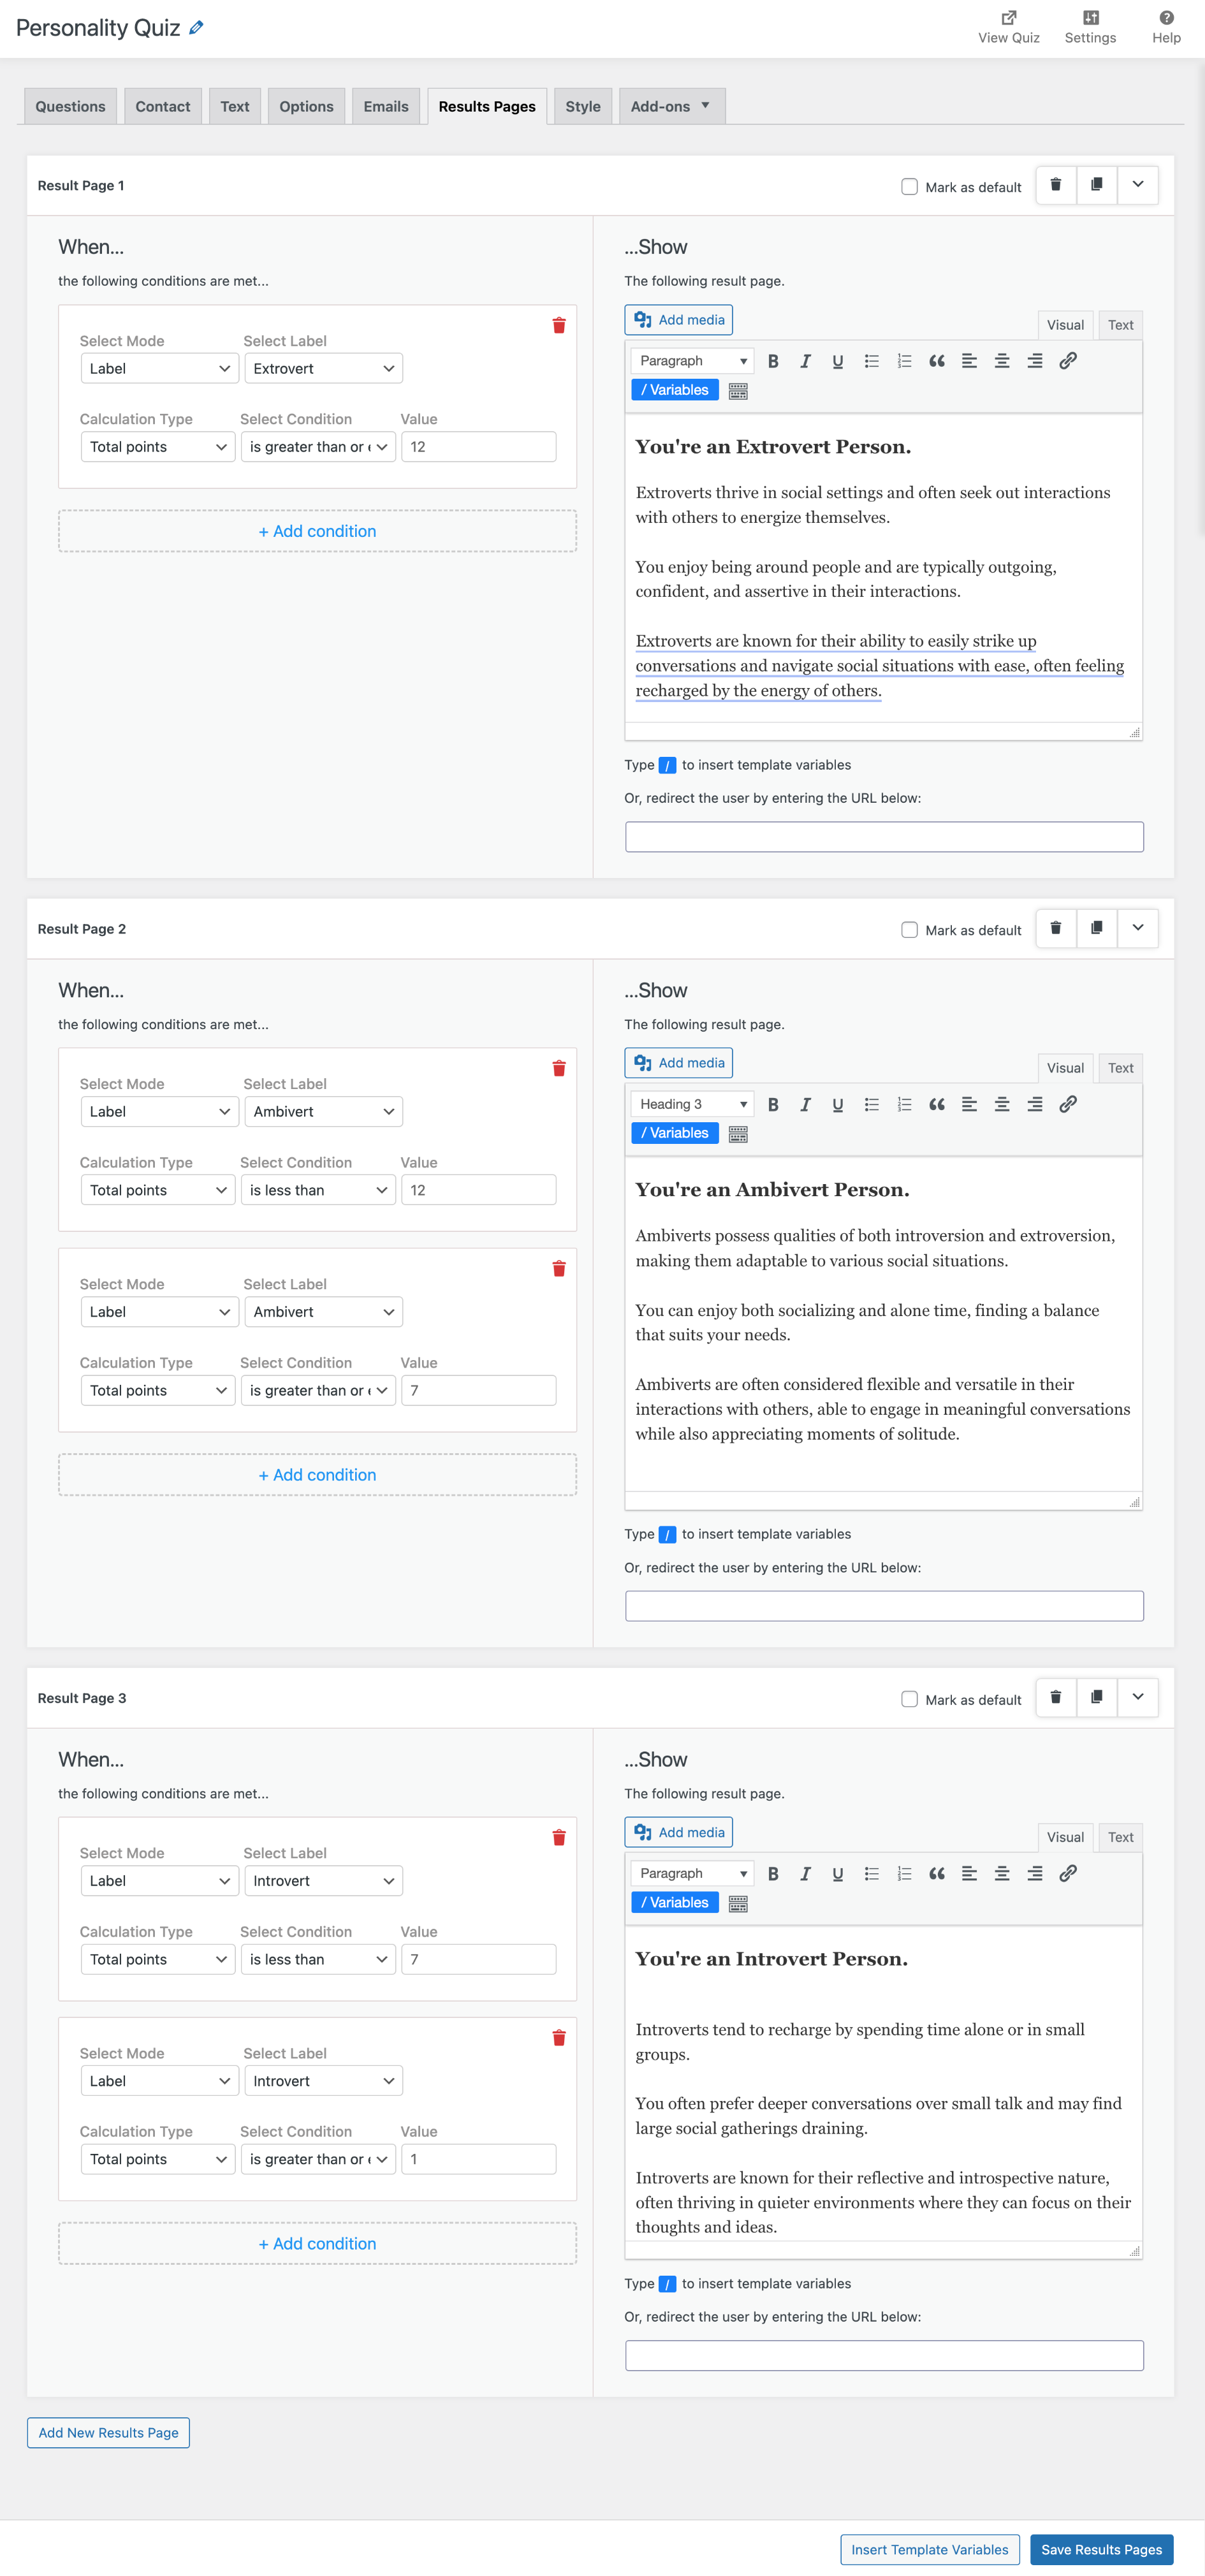
The configuration is the same as the results based on counts. When creating a result condition for a point-based system focused on one of the labels, you must first select the mode as Label and then the label name that you want to evaluate.
Now, choose “total points” as the calculation type to evaluate the results based on the points earned in the selected answers.
Here’s how we have set our conditions.
- To validate an extrovert personality through the label, the total points must be 12 or higher.
Select the label “Extrovert” from the label drop-down, choose the condition “greater than or equal to,” and set the value 12. - To validate the ambivert personality type via the label, the total points should be between 7 and 12.
Select the label “Ambivert” from the label drop-down, choose the condition “less than,” and set the value to 12. Then, create a new condition by selecting the condition “greater than or equal to” and setting the value to 7 - To validate an introvert’s personality through the label, the score should be between 7 and 1.
Select the label “Introvert” from the label drop-down, choose the condition “less than,” and set the value to 7. Now, create a new condition by selecting “greater than or equal to” and setting the value to 1
Note:
You can assign multiple labels to each answer option for a deeper and more advanced analysis of the responses. To add multiple labels to an answer option, click “Select Labels” from the Question tab and select the labels you want to assign to each answer option.
2. Label-Based Assessment Using the Separate Points for Each Label
The advanced assessment add-on allows you to assign different points to each label.
This feature helps you make a detailed assessment of participant’s responses. To add separate points for labels you must enable the feature from quiz settings:
- Go to “Advanced Assessment” from the Add-ons tab drop-down.
- Click on the checkbox next to “Label Points.”
- Now, click on Save Settings
Once done, go back to the question editor and edit the question. On the labels dropdown, you have an input field next to each label name to assign separate points to each label. You can assign separate points to each label and set your results based on the points
Managing Answer Labels
The Advanced Assessment add-on allows you to manage labels for quizzes and assessments. You can create, assign, and edit labels using a dedicated space in the QSM plugin. To manage the answer labels:
- Hover over QSM and click on Answer Labels from the dropdown in your WordPress sidebar.
- Here you’ll see a list of all the labels. To create a new label, simply enter the label name, add a slug (leave it blank to have a system-generated slug), and fill in the description (optional).
- Now, select the quizzes or assessments where you want to use the new label. If you want to use this label in all the quizzes, just select “All” from the dropdown.
- Once done, click on “Add New Answer Label.” You’ll notice that the new label is now displayed in the list.
How to update the existing labels
To manage the existing labels, hover over the label name and click on “Edit” below the label name. From the edit page, you can modify the label name, slug, and description, and change the assigned quizzes. Once done, click on “Update” to save the settings.
Tip to Use Labels Effectively
Plan your content before creating one, and add the labels to the answer label list. This practice would make creating and editing quizzes with answer labels easier.
Personalized Results and Emails Page
Advanced Assessment comes with a set of variables that help you customise your results or email pages so that you can provide better insights to your respondents based on their responses. The variables are:
- ANSWER_LABEL_COUNTS: This variable shows the list of labels and counts of label responses.
- ANSWER_LABEL_COUNT_X: This variable shows the counts for a specific label. Here, X must be replaced with the slug of the desired label.
- ANSWER_LABEL_COUNTS_PIE_CHART: This variable shows a pie chart based on the total count of responses received in each label.
- ANSWER_LABEL_POINTS: This variable shows the list of labels with their respective earned points.
- ANSWER_LABEL_POINTS_X: This variable shows points for a specific label. Here, X must be replaced with the slug of the desired label.
- ANSWER_LABEL_POINTS_PIE_CHART: This variable shows a pie chart based on the total points earned on each label.
Sample Setup of Result Page
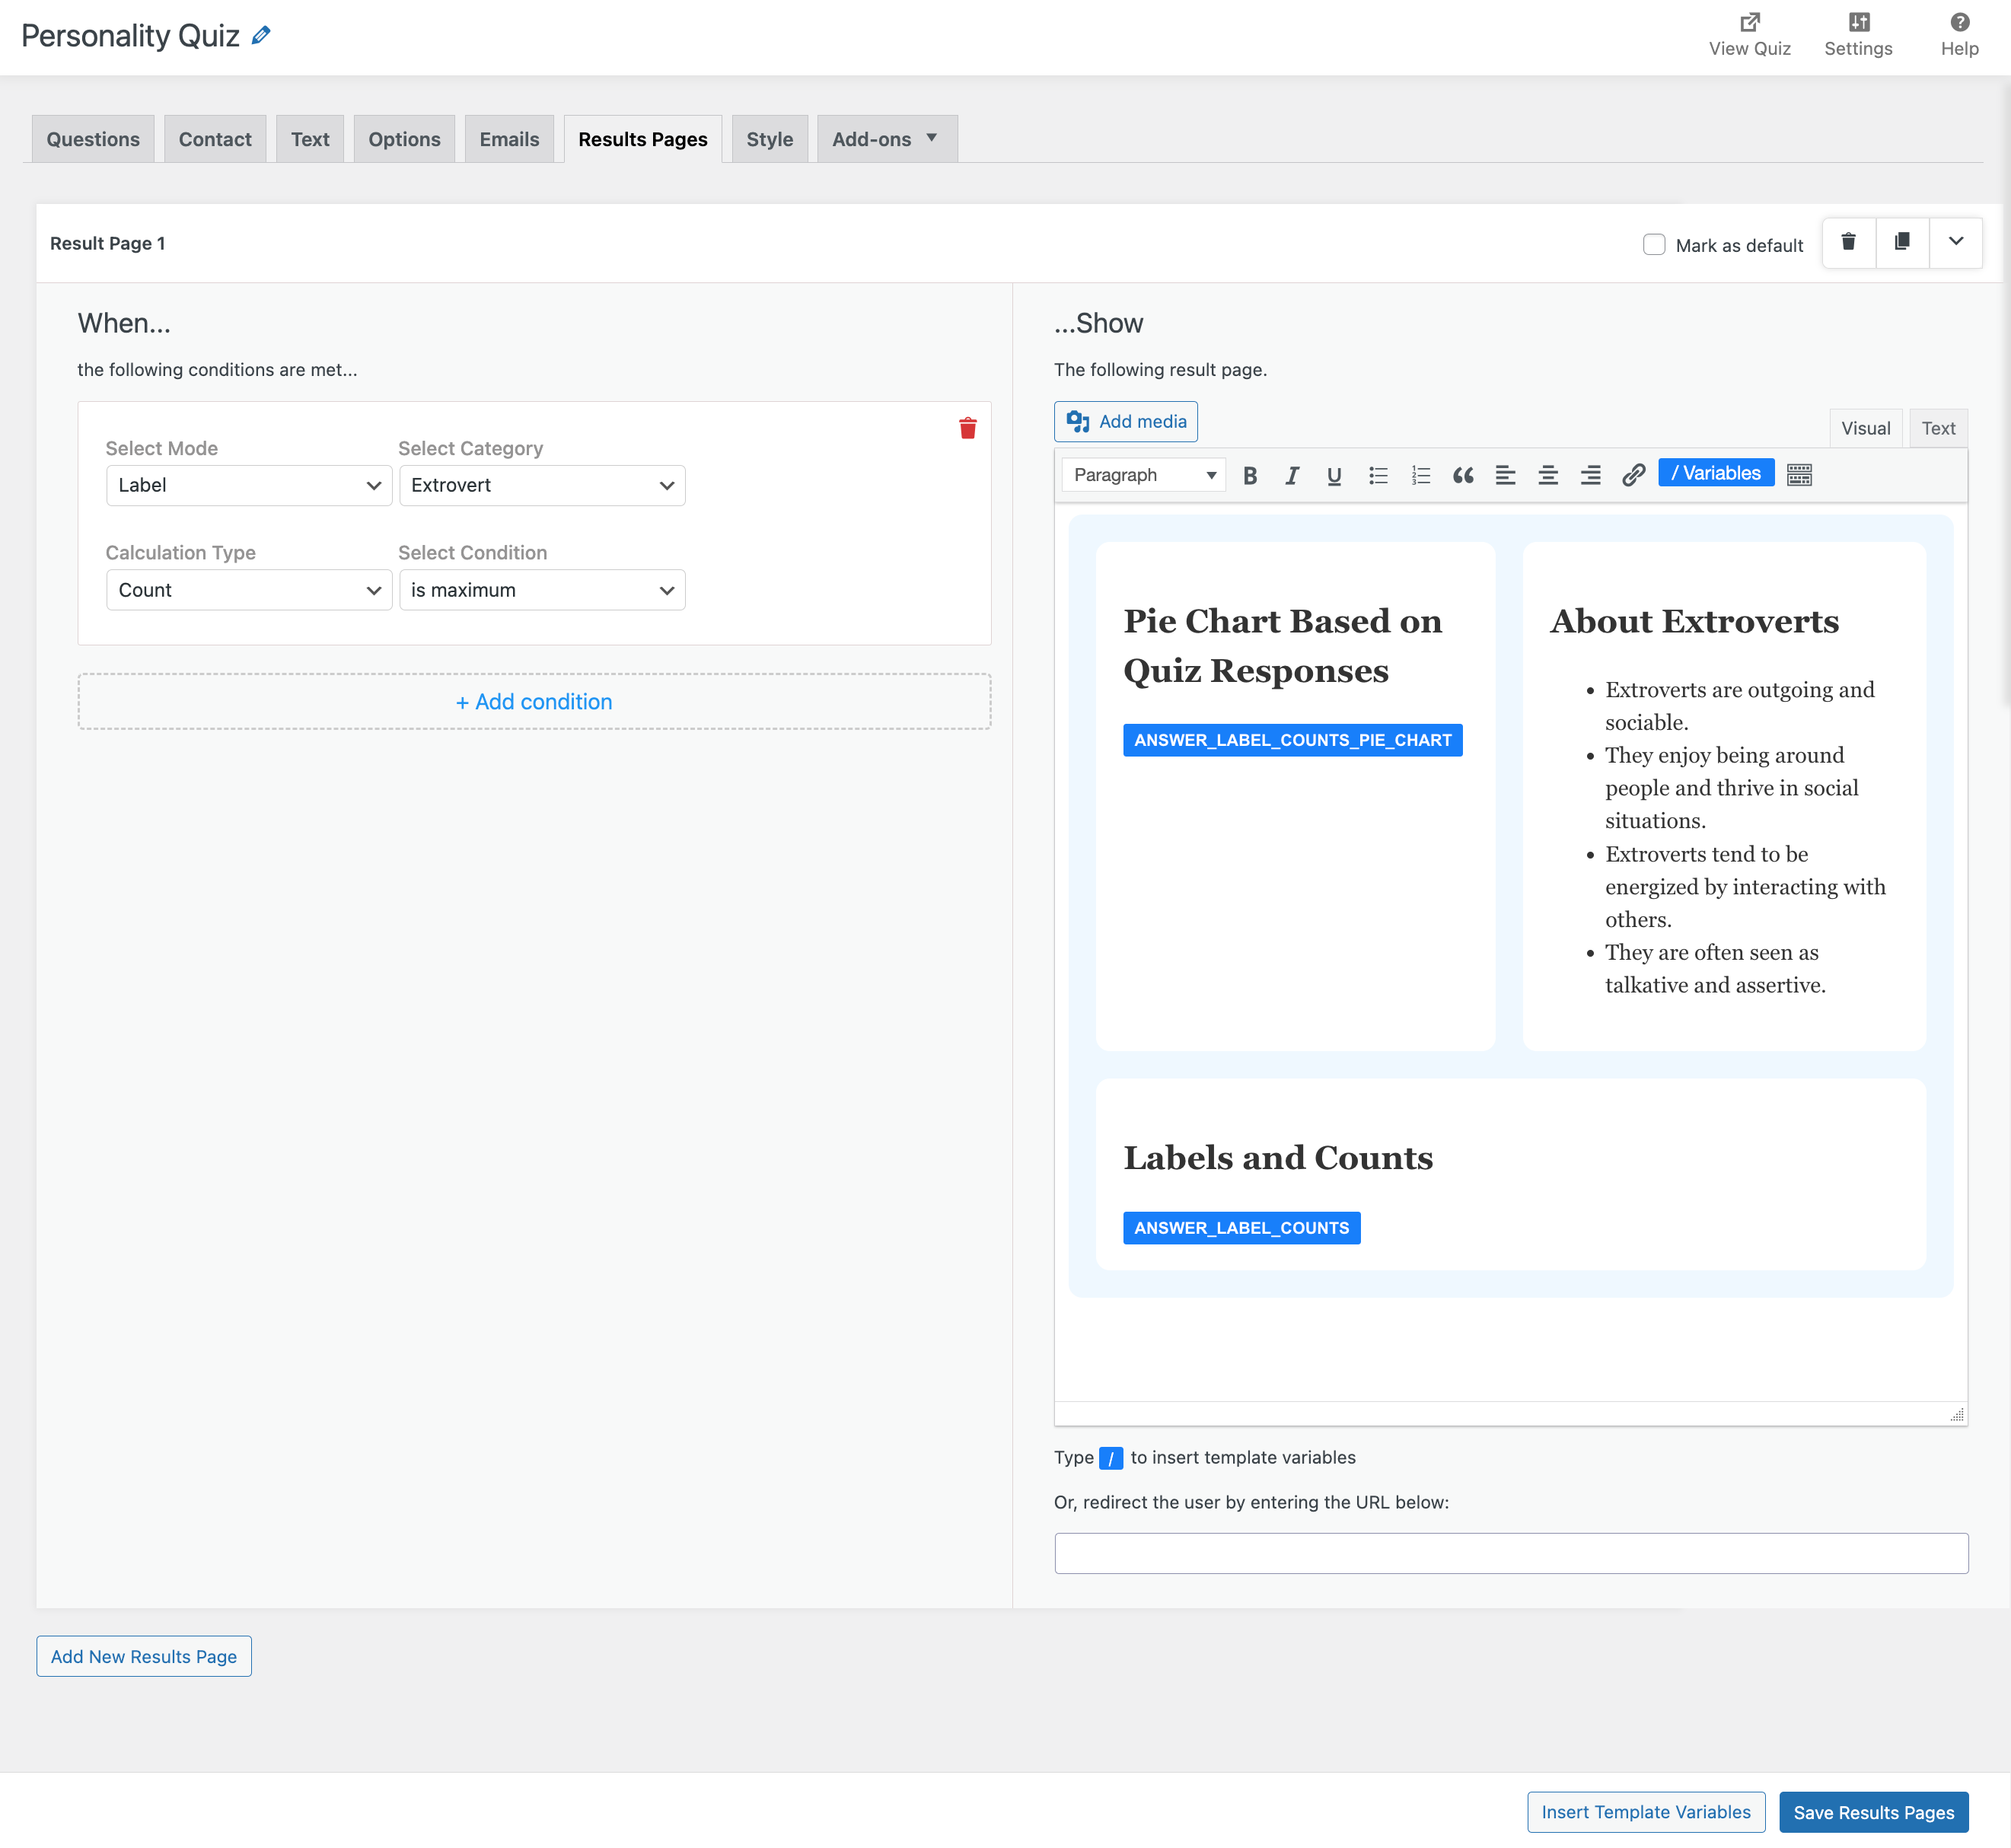
Preview of the Result After Submission
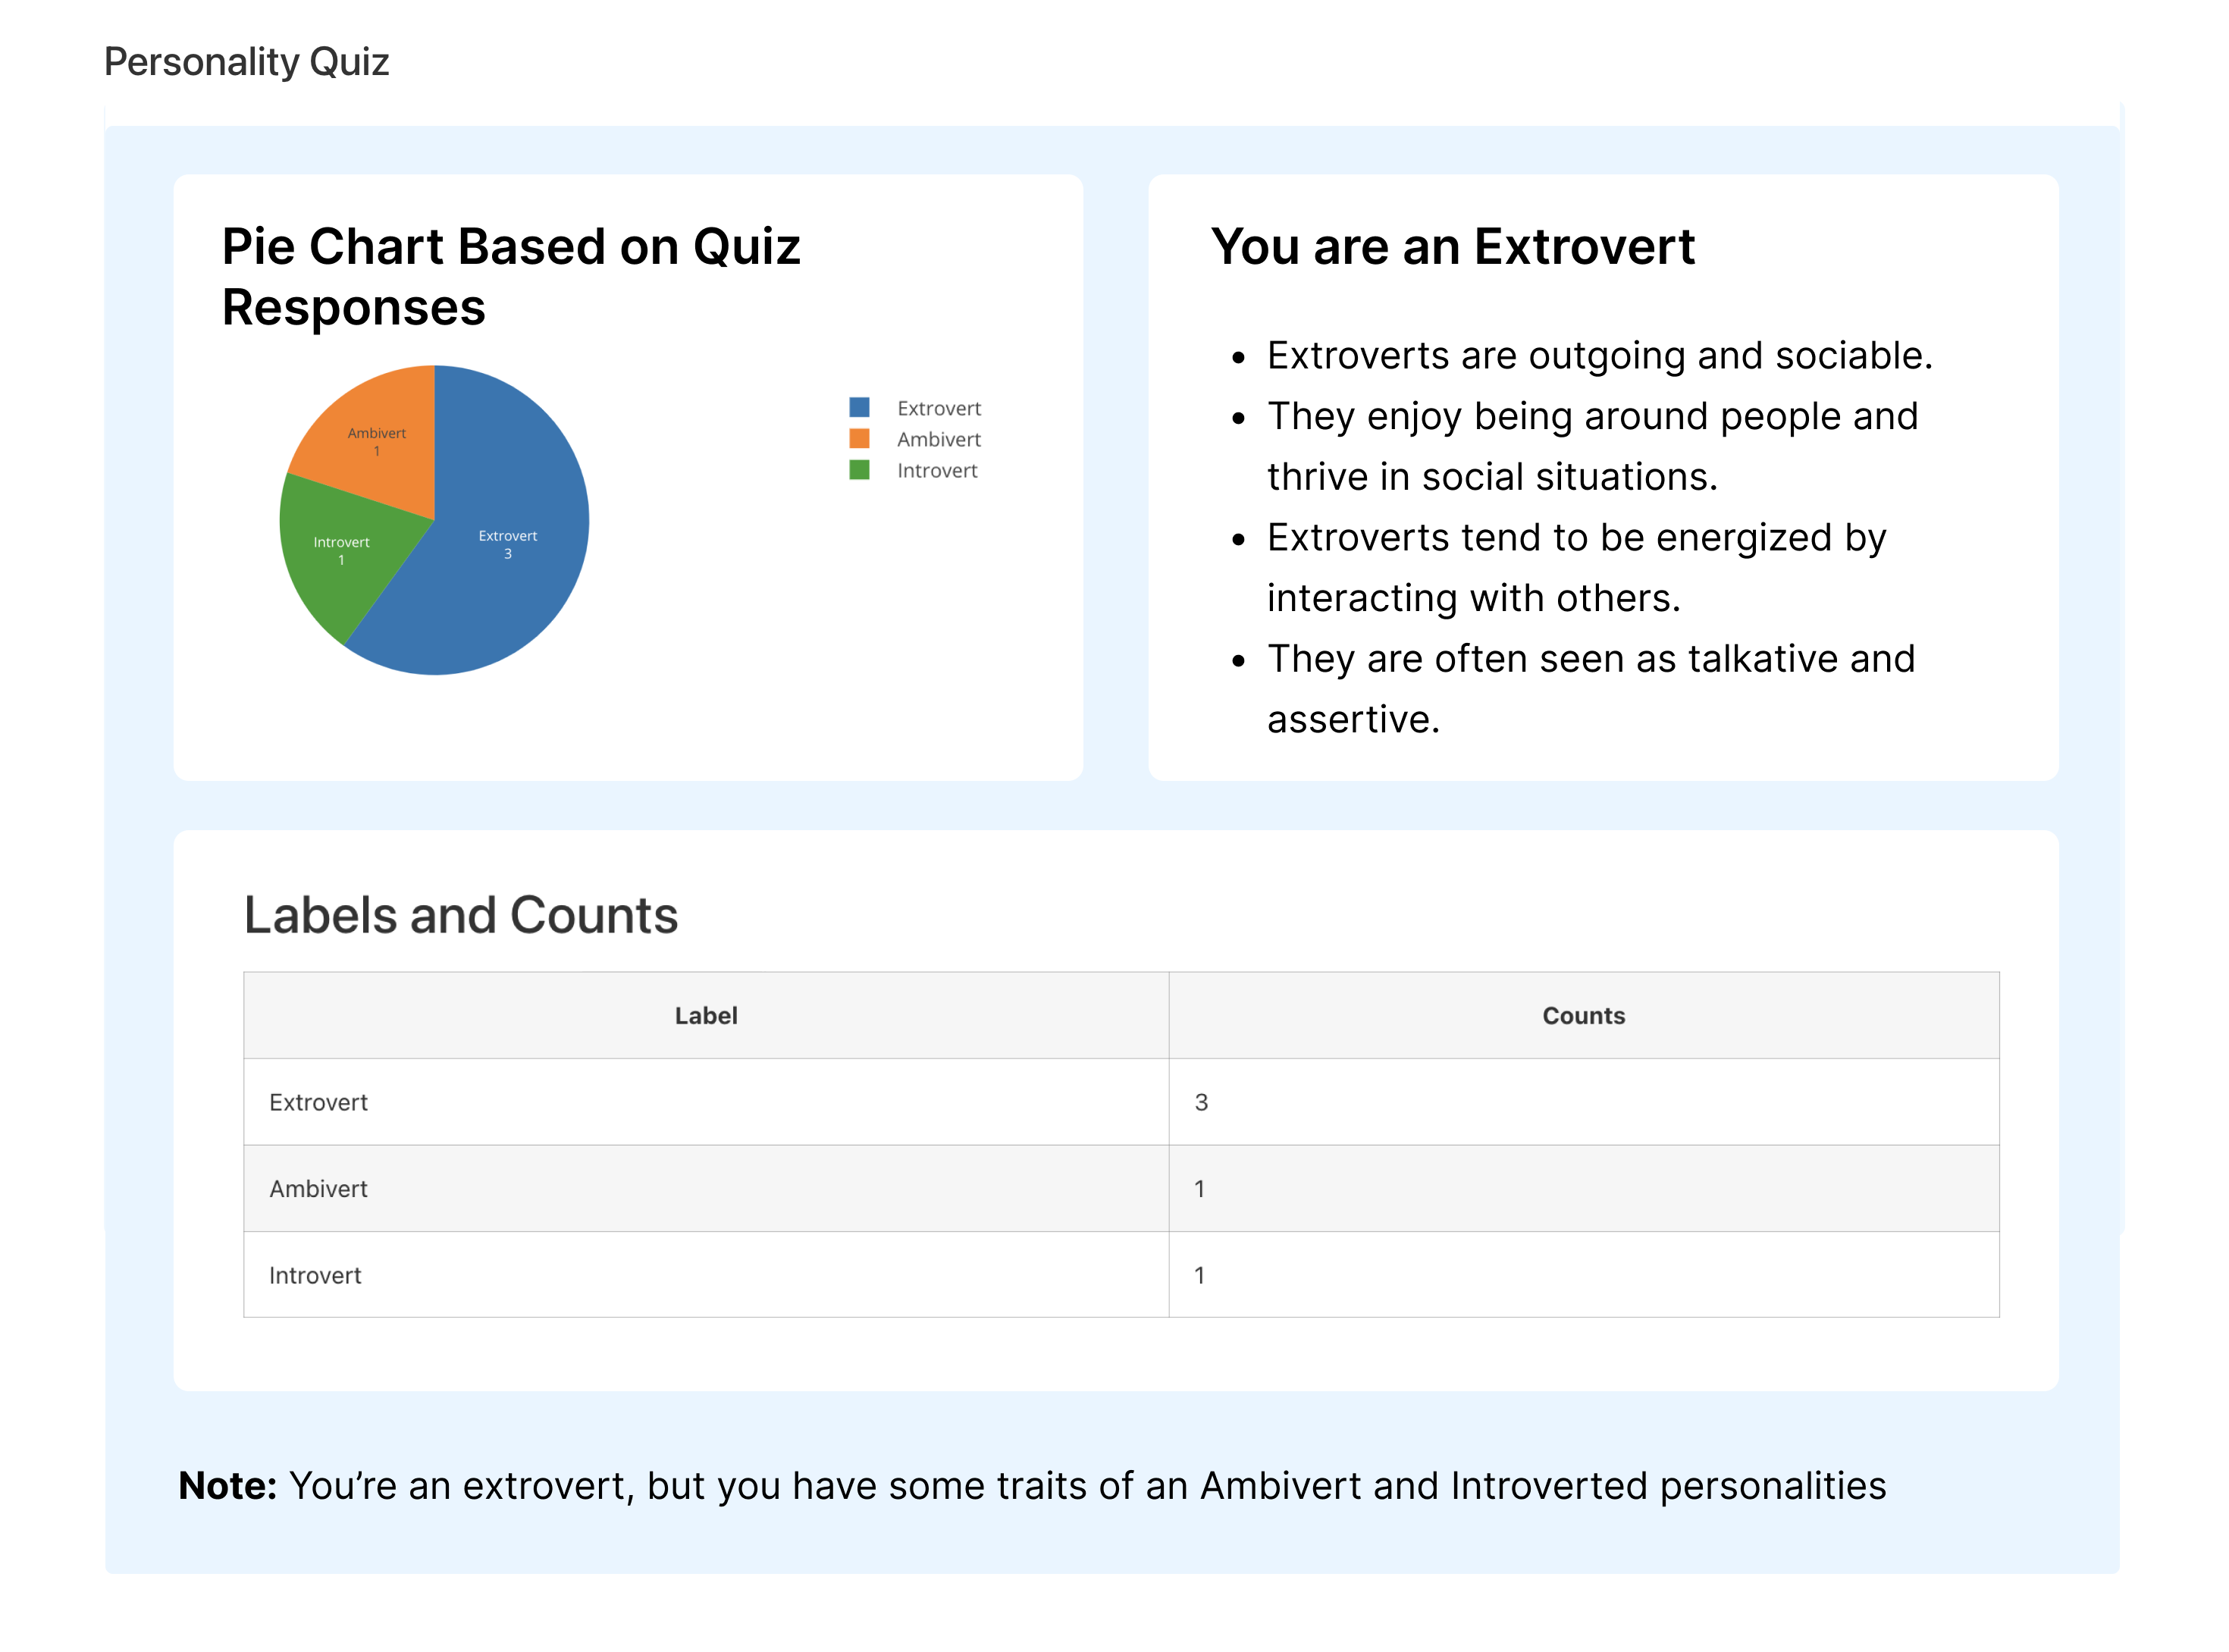
Note:
The variables are only applicable for label-based conditions and not for options.
Setting up Email Page
Just like customizing result pages, you can also configure emails that must be sent to the participants after the quiz completion. Access the “Email” tabs in the quiz/survey editor for easy configuration.
Supported Question Types
- Multiple-choice questions
- Multiple-choice questions (Horizontal)
- Multiple Response Questions
- Multiple Response Questions (Horizontal)
Best Practices
Here are some best practices for optimal usage of the Advance Assessment add-on:
- Plan Quiz Structure: Strategize the layout and flow of questions for clarity and consistency. Consider the type of questions, number of questions, and answer label you want to include.
- Detailed Label Planning: Invest time in defining and organizing labels effectively to capture participant responses and insights accurately.
- Use a point-based grading system. For personality or psychometric quizzes, we recommend using only “points” for grading and not including the “correct/incorrect” option.
- Use an Odd Number of Questions: Try making quizzes with an odd number of questions. This helps avoid tiered results and makes it easier to see different performance levels among participants.
- Range-Based Conditions: Utilize range-based conditions rather than absolute scores to ensure an accurate explanation of participant results. For example, you can set ranges like if the score is between 15 and 25 rather than “if the score is 20.”
- Diversify Question Types: Include a variety of question types, especially multiple-choice, dropdown, and multi-response questions, to capture different aspects of participant knowledge, skills, and preferences. But also prevent conflicts by ensuring the number of responses is less likely to be the same.
FAQs
Q. Can I assign different points to various labels within one answer choice?
A. Yes, you can assign different points to different answer labels within the same answer option. For that, you must enable the “separate points for labels” option from the add-on settings.
Q. Can I assign the same or different points to different labels in different answer choices?
A. Yes, you can assign the same or different points to answer labels in different answer options, giving you more flexibility when analyzing responses across multiple questions and categories.
Q. Can I track the number of responses in all labels without assigning points to them?
A. Yes, It is possible to generate a result for the number of responses received across all labels without assigning points to the labels. You can specify the result condition based on the number of responses received in the labels.
Troubleshooting
Common Issues and Solutions
If you encounter issues, ensure you meet the compatibility requirements:
- Use QSM Core 8.9.0 or higher.
- Activate your license key correctly.
Receiving Updates
Check your QSM account for the latest Quiz Proctor updates. Subscribe to our newsletter for release notifications.
Support and Contact Information
Contacting Support
For assistance, reach out to our support team on the Support Page or email us at support@quizandsurveymaster.com


