Now that we have our questions added and some text entered in, it is time for us to edit the options. First, go to the Quizzes page. From there, click the edit link under the name of the quiz you wish to edit. When the Quiz Settings page loads, click on the Options tab.
Quizzes, Surveys, and Forms can be created using two types of Paging. Manual Paging and Auto Paging.
The below Page will appear, we will now look into each option of the QSM Options Tab.
General Options Tab
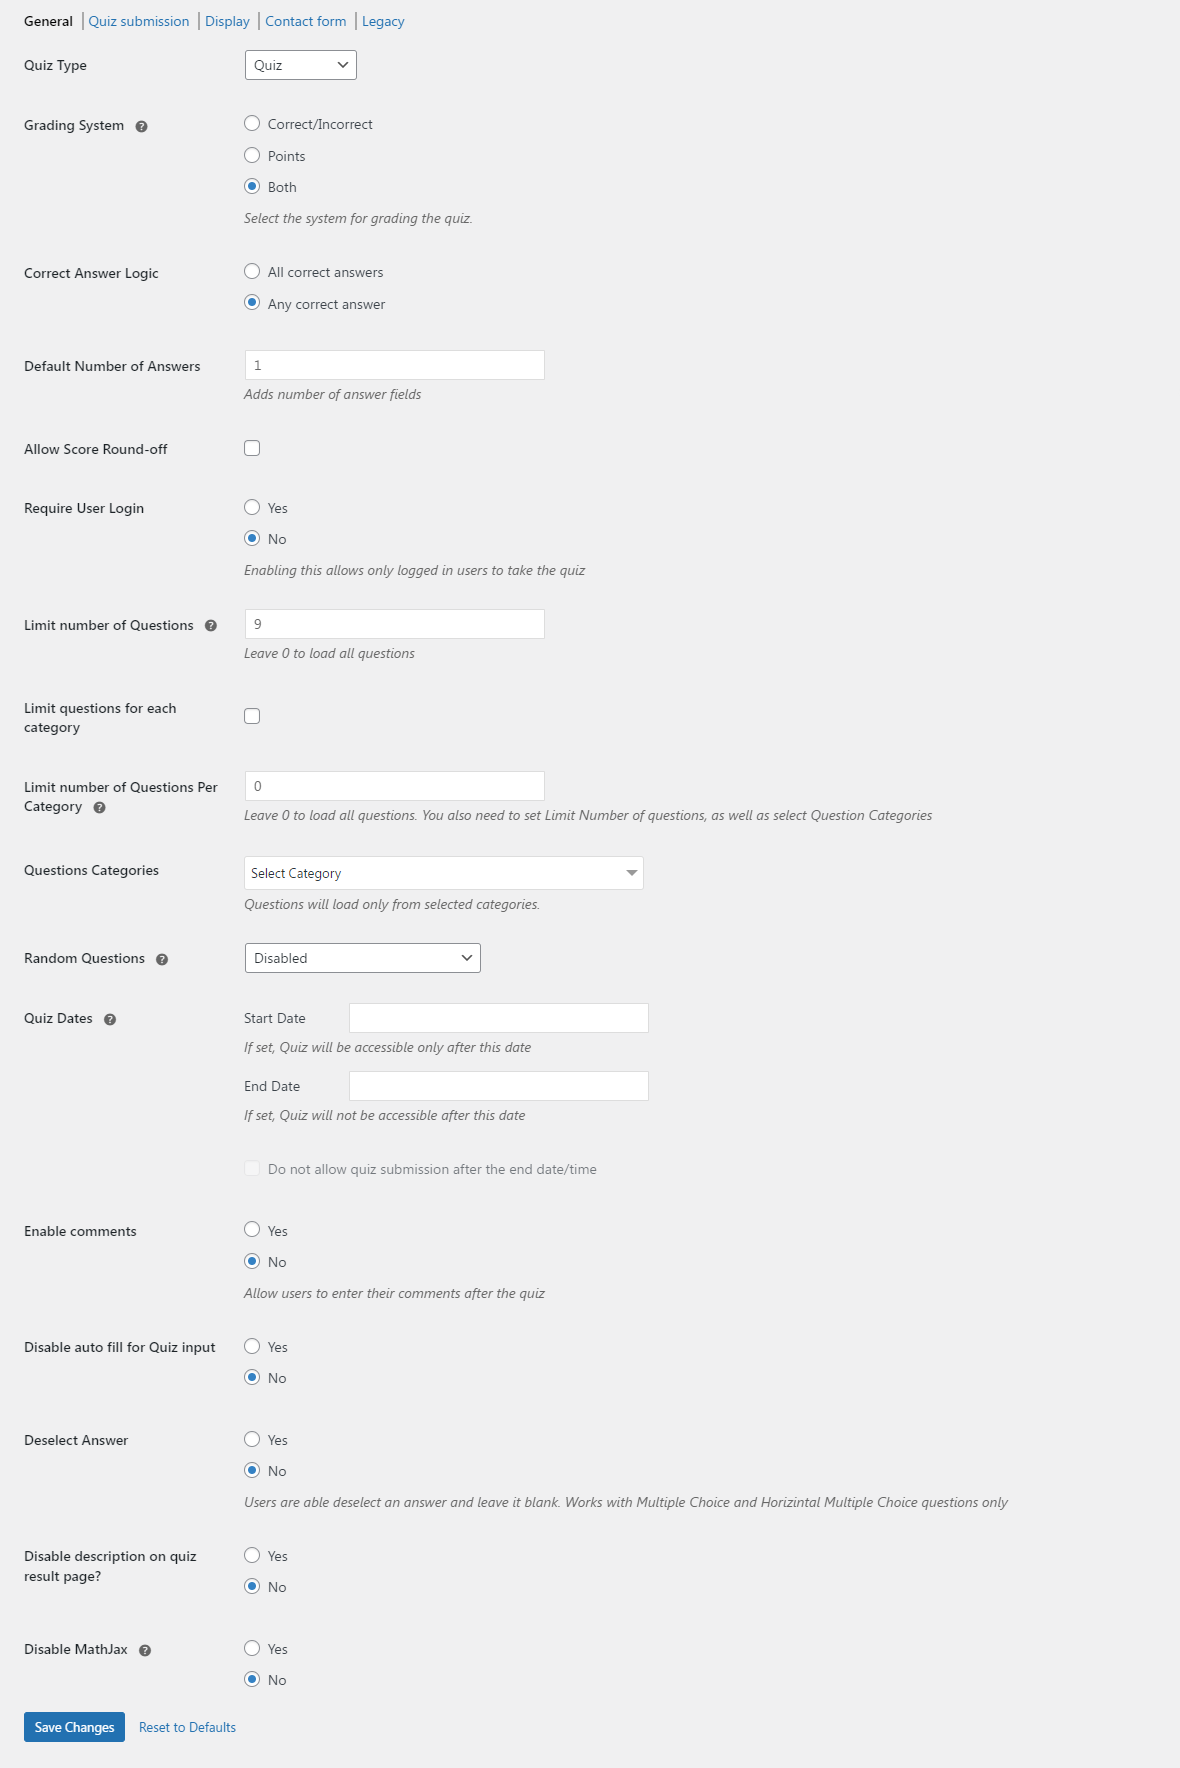
Quiz Type
Based on the Type of Quiz/Form you have chosen the option will be selected by default. You too can change the Type according to the Quiz. The Quiz Type has 3 options Quiz, Survey, and Simple Form. Based on what Quiz Type you select the Options to configure the Quiz will also change.
Grading System
Quiz and Survey Master allows for three different grading systems for your Quiz.
Correct/Incorrect
The correct/incorrect system allows you to set up your quiz to show percentages based on the overall score. You can select which answers are correct and you can show different results pages based on the percentage score the user earned from the quiz. You can also send different emails based on the percentage score if emails are enabled.
Points
The points system allows you to assign points to the answers which are added together at the end of the quiz. You can show different results pages based on the total points the user earned from the quiz. You can also send different emails based on the total points if emails are enabled.
Both
In this Option, you can use both of the Grading Systems i.e. Correct/Incorrect and Points Based.
Correct Answer Logic
If in a quiz user can submit more than one answer then you can use this option to set the correct answer logic to evaluate the same. The correct answer logic helps you achieve this.

- All correct answers – All answers submitted by the user need to be correct. The user needs to select all the correct answers, if he misses selecting any of the correct answers, the answer will be marked as incorrect.
- Any correct answer – Some of the answers selected by the user are to be marked as correct. This means, the user can select any of the correct answers and the answer will be marked as correct.
This option will work on the Multiple Response, Horizontal Multiple Response & Fill in the Blanks Question Types.
All Correct Answers
| User Ans. Selection | Correct 1 | Correct 2 | Incorrect 1 | Incorrect 2 | Result |
| Condition 1 | Answered | Answered | NA | NA | Correct |
| Condition 2 | Answered | Answered | Answered | Answered | Incorrect |
| Condition 3 | Answered | NA | NA | NA | Incorrect |
| Condition 4 | Answered | Answered | Answered | NA | Incorrect |
| Condition 5 | NA | NA | NA | NA | Incorrect |
Any Correct Answers
| User Ans. Selection | Correct 1 | Correct 2 | Incorrect 1 | Incorrect 2 | Result |
| Condition 1 | Answered | Answered | NA | NA | Correct |
| Condition 2 | Answered | Answered | Answered | Answered | Incorrect |
| Condition 3 | Answered | NA | NA | NA | Correct |
| Condition 4 | NA | NA | NA | NA | Incorrect |
Note: If you have added multiple answers and the user entered an incorrect answer the final output will be considered incorrect.
Default Number of Answers

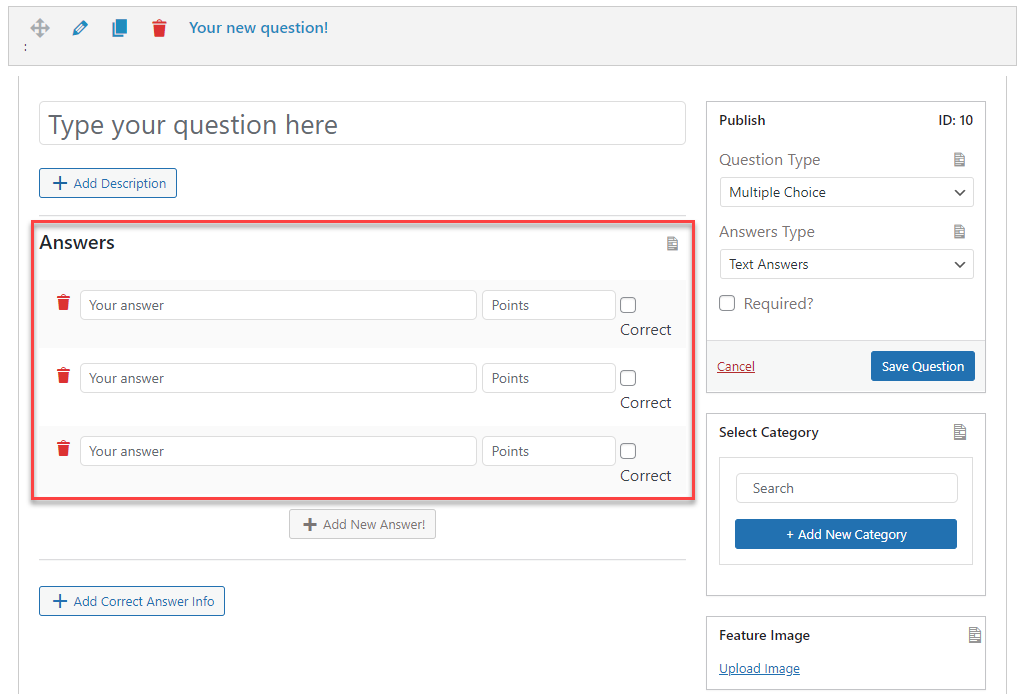
This option lets you set the default number of answers for each question while creating a quiz/survey. By default, the number is set to 1 but you can change it to any number of choice. Based on the set number the answer fields get automatically created. However, if you want to add more answer fields you can do so manually by clicking on the “Add New Answer” button.
Allow Score Round-off
With this option is enabled it will round off the Score of correct/incorrect answers to a whole number
Require User Login
With this option enabled only logged-in users can take the Quiz.
Limit number of Questions
By using the option, it is possible to restrict the number of Questions that appear in the Quiz. For instance, if you set the value to 5, only 5 out of the total 20 Questions will be displayed. On the other hand, if you want to display all 20 Questions, you can set the value to 0. Note that the default value is set to 0.
Limit questions for each category

With this option, you can set a restriction and control the number of questions that can be displayed to the user in each category. If you enable this option, you will find the category drop-down and number fields, you can then select the category and assign the number of questions you want to display for that particular category. Note that, for this function to work properly you must set the “Limit Number of Questions” too.
Limit number of Questions Per Category
Allows you to control the number of questions to be shown per category. To load all questions leave 0. You need to set Limit Number of questions, as well as select Question Categories in order to make this option work.
Questions Categories
Select the questions to load from a particular category. For this to work you must have assigned questions to categories in the Question Tab.
Random Questions
The Random Questions settings have four different controls that can be used in manual and auto-paging.
Random Questions
When Random Questions is enabled the Questions appear randomly in the Quiz from all the categories.
Random Questions and Random Answers
When Random Questions and Random Answer option is enabled the Questions appear randomly along with a random sequence of the answers. For example, in a multiple-choice question, the sequence of options will be random.
Random Answers
When the Random Answers option is enabled, the sequence of answers will appear random whereas the sequence of Questions will remain the same.
Disabled
When the option is set to disabled, the sequence of Questions and Answers will appear the same as they were set in the Questions Tab. By default, the option is disabled
Quiz Dates
You can set the Quiz Start and End Date. Where the users can only be able to access the Quiz if they try to access the given on or before the End Date. The Quiz won’t be accessible if the user tries to access it after the End Date. By default, the field is blank.
Enable Comments
If this option is enabled the users taking the quiz will be displayed with a Comment Box at the end of the Quiz, where they can enter their comments and suggestions on the Quiz. By default, the option is disabled.
Disable Auto Fill For Quiz Input
If this option is enabled then there will be no auto-fill suggestions for the quiz input form.
Deselect Answer
If this option is enabled, the Users will be able to deselect an answer and leave it blank. It Works only with Multiple Choice and Horizontal Multiple Choice questions only. By default, the option is disabled.
Disable Description on Quiz Result Page
With this option, you can disable the question description from displaying on the results page and only show the question title on the results page.
Disable MathJax
With this option, you can write math formulas for technical questions in your quiz using TeX and LaTeX notation.
Quiz Submission Tab
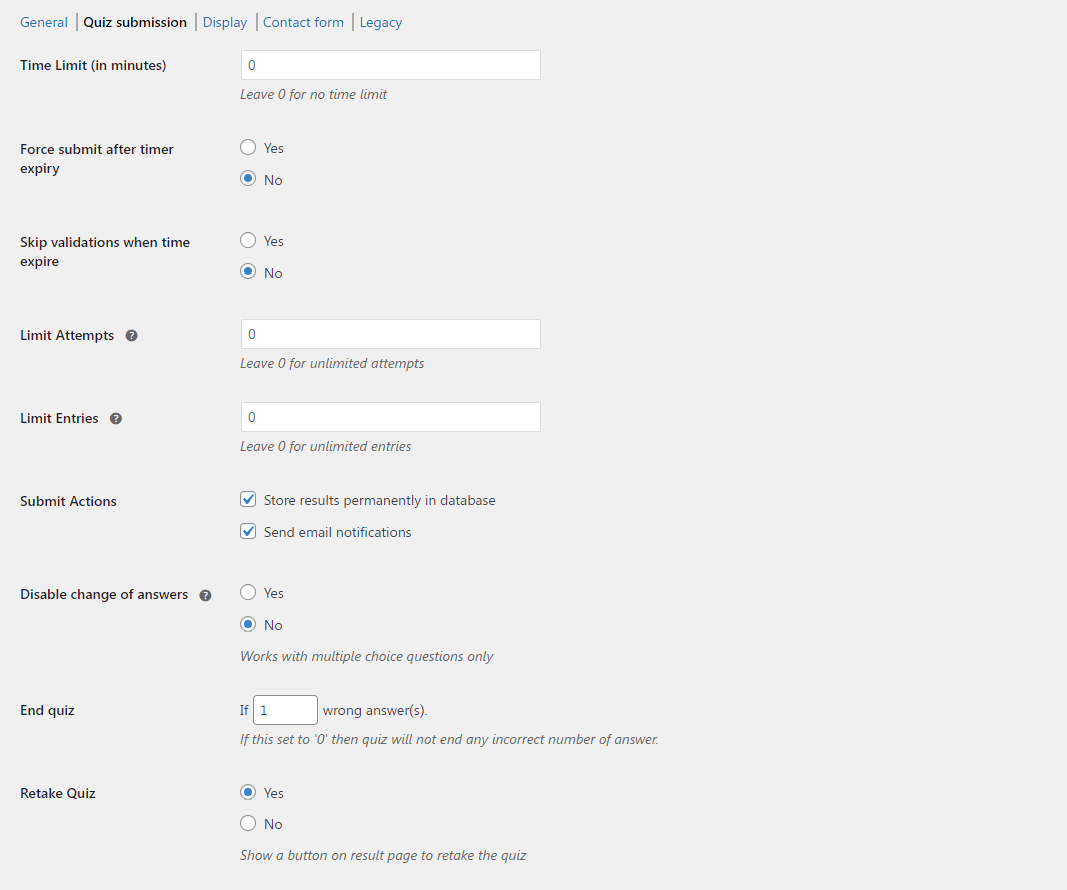
Time Limit (in minutes)
Here you can set up a timer for your Quiz. Once the user takes the Quiz the timer starts and alerts the user of the time left and also if it is time-up! The timer appears at the bottom-right of the Quiz Page. By default, the value is set to 0.
Force Submit After Timer Expiry
With the Option Enabled the Quiz will automatically be closed after the elapsed time and the user will be displayed the Quiz Results. This will only work when the Time Limit is set to a certain value.
Skip Validations When Time Expire
When this option is enabled the Quiz will skip all validations when the timer expires.
Limit Attempts
With the option, you can limit the number of times a user can access the Quiz. If the number is set to 1 and the user tries to take the Quiz again; they will be presented with the message alerting “You have utilized all of your attempts to pass this quiz.” or any other text set by you in the Text Tab. By default, the value is set to 0.
Limit Entries
With the option, you can limit the number of users who can take the Quiz. If the number is set to 10 and the 11th user tries to take the Quiz again; they will be presented with the message alerting “Unfortunately, this quiz has a limited amount of entries it can receive and has already reached that limit.” or any other text set by you in the Text Tab. By default, the value is set to 0.
Submit Actions
Control what happens when the submit button is clicked and the quiz is submitted. You can opt for:
- Store results permanently in database – By Enabling this Option the Quiz Responses and Results will be permanently stored in the database and can be accessed anytime by the Quiz Admin. By default, the option is enabled
- Send email notifications – If this option is enabled the users/quiz admin will be notified of the quiz submission via. email
Check the checkboxes beside each option to enable/disable it.
Disable Change Of Answers
If this option is enabled the user cannot change their response after selecting a particular answer. This option works only with Multiple Choice Questions. By default, the option is disabled.
End quiz
This option lets you end a quiz after “n” number of wrong answers by the user. You can set the number to any positive digit, if the number is set to 0 then the quiz will not end even if the user answers the questions incorrectly. Note that this option only works with vertical Multiple Choice, horizontal Multiple Choice, drop down, multiple response, and horizontal multiple response question types.
If Manual Pagination is enabled (Questions per Page is set to any value other than 0) for a particular quiz/survey and the user tries to answer questions incorrectly then this won’t automatically end the quiz. The user will have the chance to fix their mistake and the quiz/survey will only end when the Next button is clicked.
Retake Quiz
If this option is enabled, the user will be allowed to retake the Quiz by showing a “Retake Quiz” Button after completing the Quiz and viewing the Quiz Results. By default, the option is disabled.
Display Tab
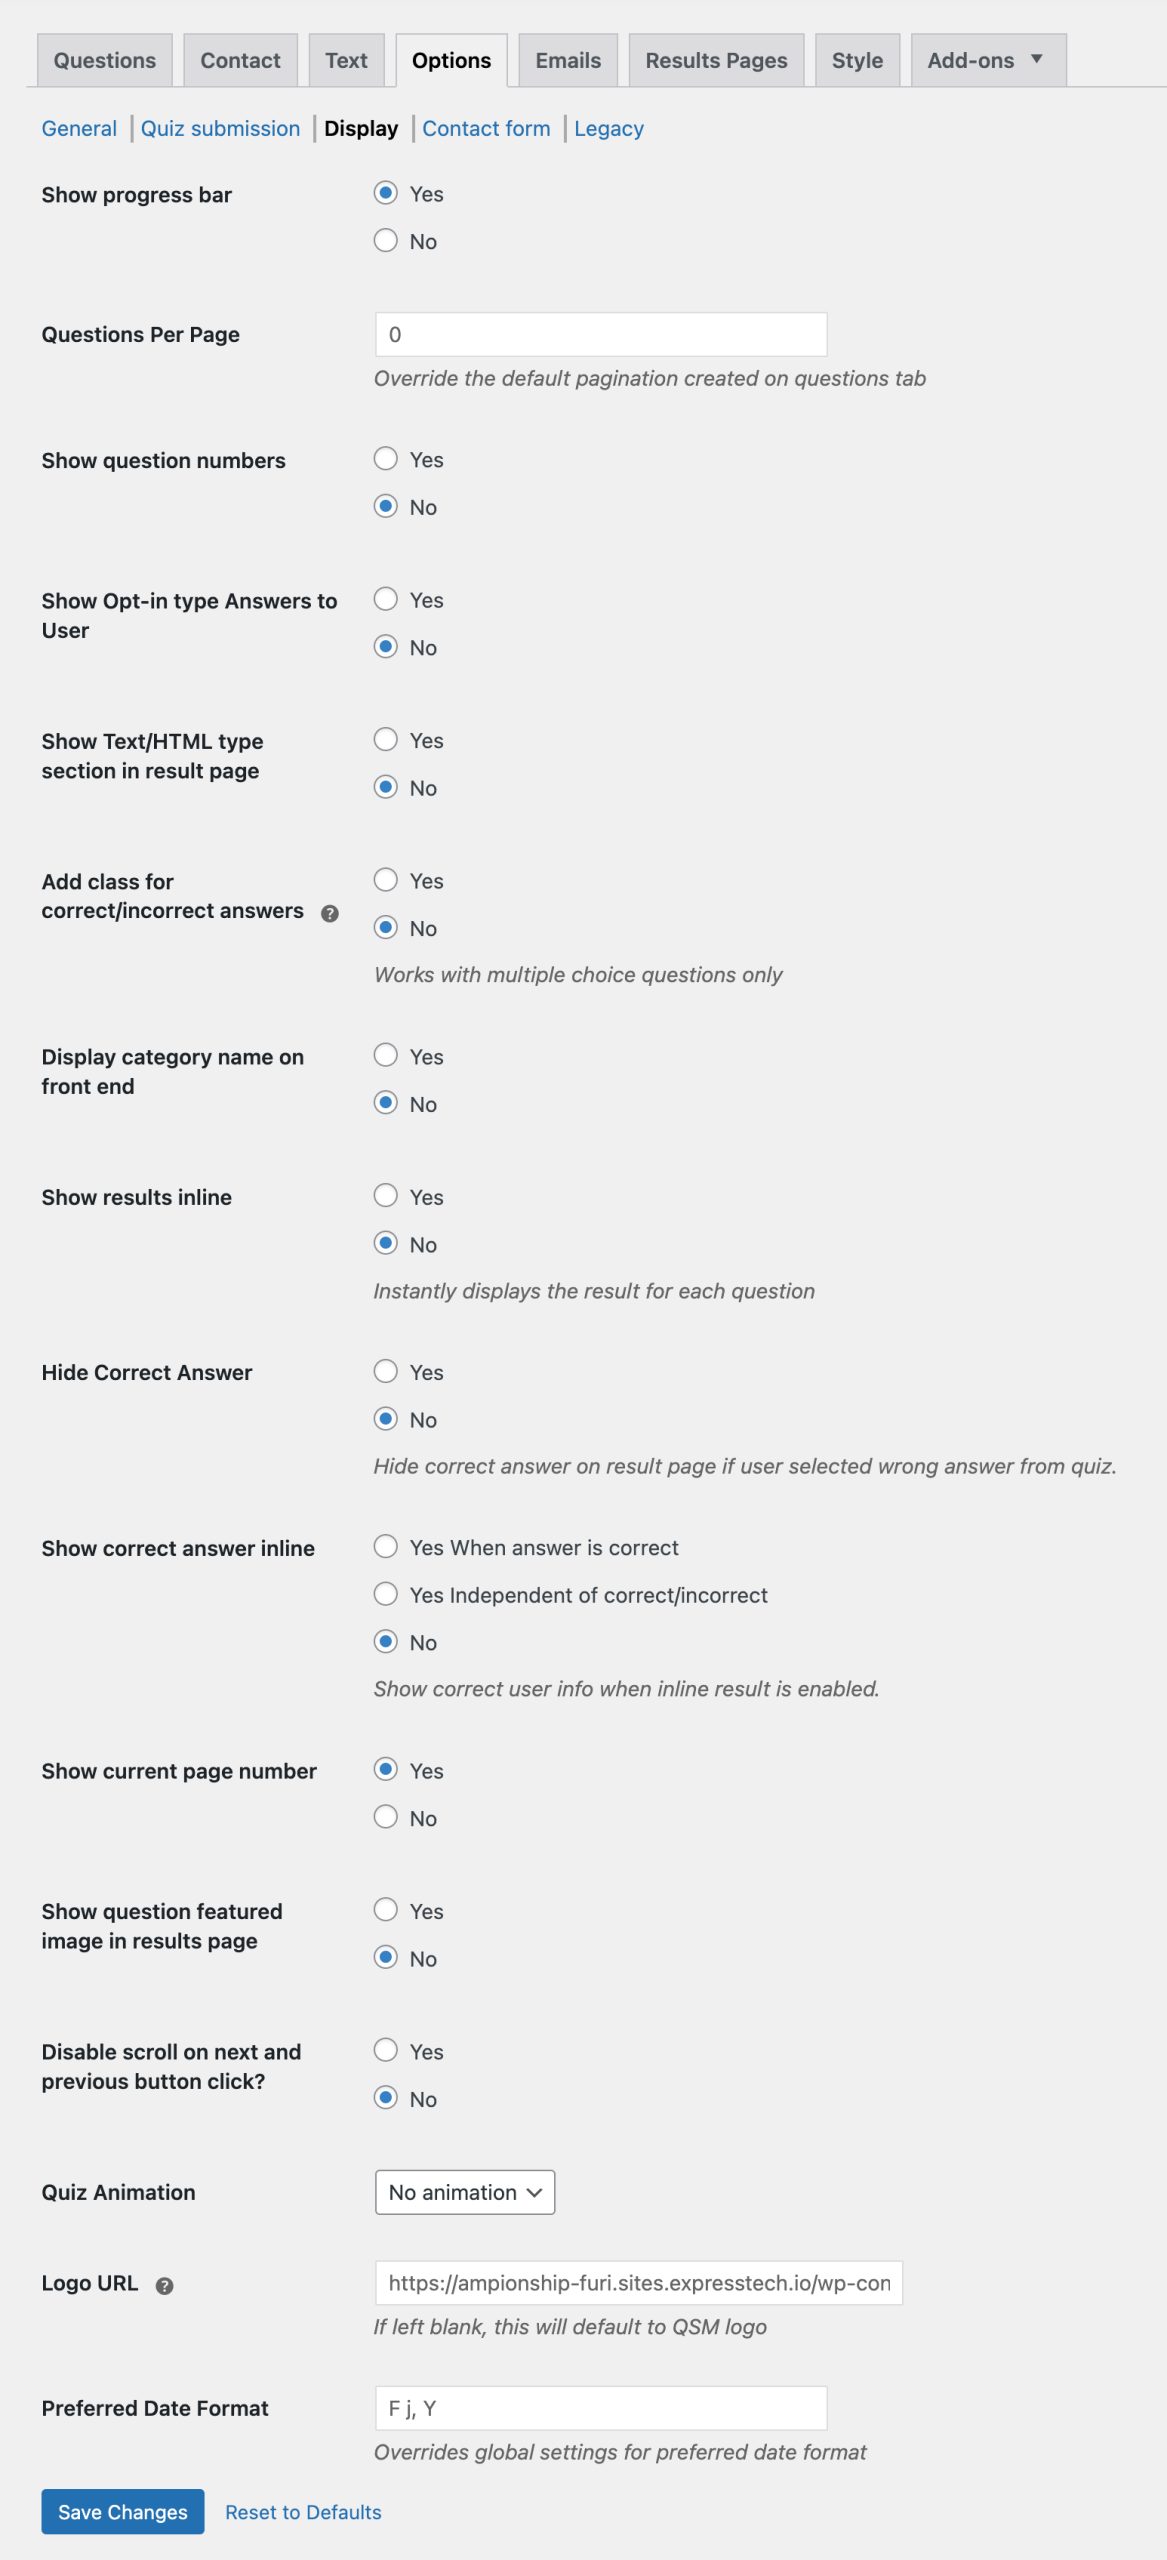
Show Progress Bar
With this option enabled users taking the Quiz will see a Progress Bar with the Percentage of Quiz Taken and Left. The progress bar will only show up if your Quiz has Multiple Question Pages.
Questions Per Page
With this option you can set the number of questions you want to display per page to the user.
- Manual Paging: When the questions per page option is set to 0 (disabled) this is called manual paging. In manual mode, you decide how many questions appear on each quiz page by setting it up in the questions tab.
- Auto Paging: When the questions per page are set to any number other than 0 (enabled) this is called auto paging.
Show Question Numbers
If this option is enabled Question Number will be displayed before each question of the Quiz. By default, the option is disabled.
Show Opt-in type Answers to User
Disabling this option will not show opt-in type answers to the user
Show Text/HTML type section in result page
If this option is enabled, you can display the design/content created with the “Text/HTML Section” Question Type on the result page.
Add Class For Correct/Incorrect Answers
If this option is enabled it Dynamically adds a class for incorrect/correct answers after the user selects an answer. This only works with multiple-choice questions. By default, the option is disabled.
Display Category Name On Front End
If this option is enabled the Category Name will be displayed to the user besides the Quiz while attempting the Quiz. By default, the option is disabled.
Show Results Inline
If this option is enabled, each Question’s result will be displayed on the page after the user attempts the question of the Quiz. That means if the user selects the Correct Answer “Correct! You have selected the correct answer.” will be displayed or if the answer is incorrect “Wrong! You have selected the wrong answer.” will be displayed to the user. By default, the option is disabled.

If the user happened to select a wrong answer then along with the Wrong Answer alert the correct answer will be highlighted in Green Color. Note that this option only works for multiple choice, short answer, and number question types.
Show Correct Answer Inline
If this option is enabled you will be able to display the correct answer inline using two ways
- Yes When answer is correct – The correct answer info only will be displayed when the answer will be correct.
- Yes Independent of correct/incorrect – The correct answer info will be displayed independent of whether the answer given by the user is correct or incorrect.
- No – The answer won’t be displayed inline.
Note that this option only works for multiple choice, short answer, and number question types.
Show Current Page Number
If this option is enabled, the current page number of the Quiz will be displayed to the user attempting the Quiz. By default, the option is disabled.
Show question featured image in results page
This option lets you show the featured images of each question on the results page after the user submits the quiz/survey. For this option to work as intended, you should use Question Featured Images inside your quiz/survey.
Disable scroll on next and previous button click?
When this option is enabled scroll will be disabled on click of the next and previous button
Quiz Animation
In this option, you can set the Quiz Appearance animation. This animation is visible when the Quiz is being loaded by the user. Animations like bounce, flash, pulse, rubberband, shake, swing, tada, wobble, jello, and heartbeat are available. By default, No animation is applied.
Logo URL
Select the Facebook share logo. Here you need to enter the URL of an image that will be used as a logo while sharing on Facebook.
Preferred Date Format
With this option specify the date format that you want to validate for a specific quiz/survey.
Example:
- Specify the format as F j, Y to get the date as April 15, 2022
- Specify the format as Y-m-d to get the date as 2022-04-15
- Specify the format as m/d/Y to get the date as 04/15/2022
- Specify the format as d/m/Y to get the date as 15/04/2022
To set your global default date format value by navigating to QSM -> Settings -> Quiz Default Options -> Preferred Date Format.
Contact Form Tab
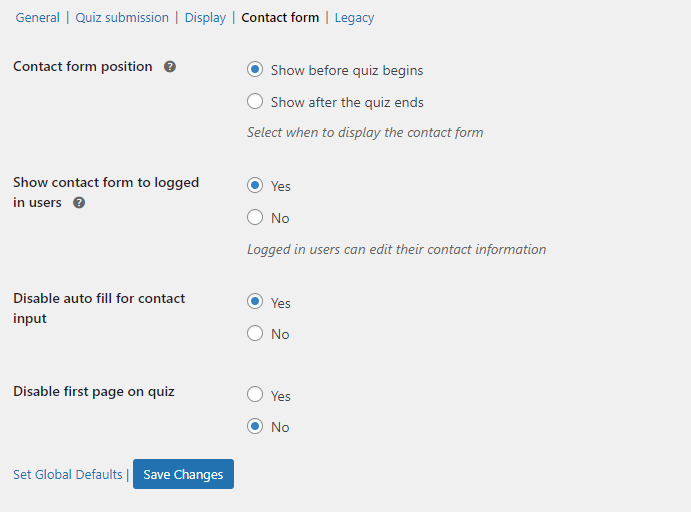
Contact Form Position
In this option, you can decide the position of the Contact Form. That means you can make the form appear before the Quiz Begins or after the Quiz ends. This option is only applicable when you have configured the Contact Form from the Contact Tab. By default, the form is displayed before the Quiz begins.
Show Contact Form To Logged In Users
With this option enabled the Contact Form will only be displayed to the logged-in users and the logged-in users can edit their contact information. The information will still get saved if the option is disabled.
Disable Auto Fill For Contact Input
If this option is selected then there will be no auto-fill suggestions for the contact input form.
Disable first page on quiz
If this option is selected the first page of the quiz will not be shown to the user
Setting Global Defaults
You can now set Global Default Options for a Quiz/Survey that will be reflected by hitting the “Set Global Defaults” button on the Options Tab. So, whenever you create a new quiz, the options will be set as per global defaults automatically. Know more about global defaults by visiting the Quiz Default Options documentation.
⚠ Note: Facebook has removed the text sharing support meaning, Now the Facebook share will not include the words for the “Text” page in the actual Facebook post.


